Building Workflow Templates
Workflow templates define the sequence of steps a document or record moves through. Each template is assembled on a canvas by connecting action request nodes into a directed flow. Templates are enabled or disabled independently, and can be scoped to specific document types and projects.
Before building a template, all required action requests should be configured in the Action Request Manager.
Who configures this
Users with access to the Workflow Setup area, accessible from the New module.
Before you start
- Confirm all required action requests are created and saved in the Action Request Manager.
- Confirm which document types and projects the template should apply to, if scoping is needed.
- Decide whether the template will be grouped with related templates.
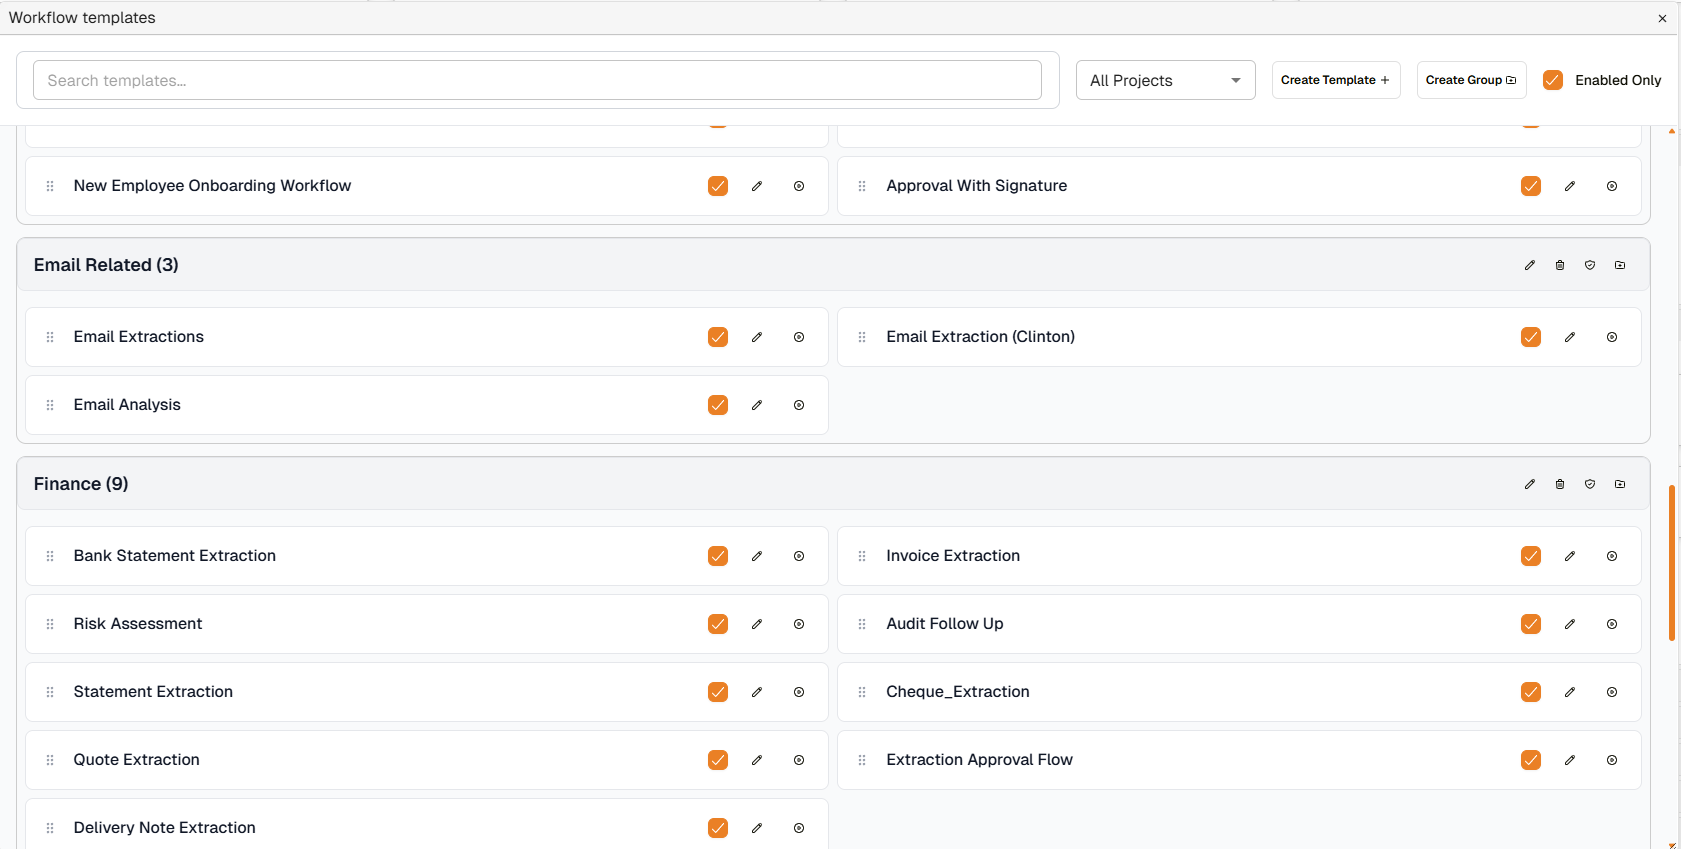
Workflow Templates panel
The Workflow Templates panel is the register of all workflow templates. It is accessible from New > Workflow Setup > Templates.
Workflow Templates panel
Panel controls
| Control | Description |
|---|---|
| Search templates... | Filters the list by template name. |
| All Projects | Filters the list to show templates scoped to a specific project. Defaults to showing all. |
| Create Template | Opens the template editor to configure a new workflow template. |
| Create Group | Creates a named group to organise templates. |
| Enabled Only | When checked (default), only enabled templates are shown. Uncheck to see disabled templates. |
Template list
Each row in the template list represents one workflow template.
| Element | Description |
|---|---|
| Drag handle | Reorders the template within its group by dragging. |
| Template name | The name of the workflow template. |
| Enabled checkbox | When checked, the template is active and available for selection when initiating a workflow. When unchecked, the template is disabled and hidden from users. |
| Edit button | Opens the template editor for this template. |
| Delete button | Deletes the template. Templates in use by active workflows cannot be deleted. |
Groups
Templates can be assigned to named groups for organisation. Each group shows its name and the count of templates it contains.
| Control | Description |
|---|---|
| Add Template (group button) | Creates a new template directly within this group. |
| Collapse/Expand | Collapses or expands the group to show or hide its templates. |
| Rename Group | Renames the group. |
| Delete Group | Deletes the group. Templates in the group are not deleted; they become ungrouped. |
Template editor
Clicking the edit button on any template, or clicking Create Template, opens the template editor.
The editor header shows Editing Workflow — [Template Name] and contains three tabs: Settings, Nodes, and Versions.
Settings tab
The Settings tab contains the basic configuration for the template.
| Field | Description |
|---|---|
| Template Name | The name of the workflow template. This name is shown in the template selection dropdown when initiating a workflow. |
| Workflow Type | Sets the type of workflow. |
| Document Type | Limits the template to a specific document type. If set, the template only appears when initiating a workflow on documents of that type. |
| Project | Limits the template to a specific project. If set, the template only appears for documents within that project. |
Nodes tab
The Nodes tab contains the canvas where the workflow flow is built.
Node sidebar
The left panel lists available node types, organised into categories. Users select and add nodes from this panel to the canvas.
| Category | Description |
|---|---|
| USER & ROLE MANAGEMENT | Nodes for assigning users or roles to workflow steps. |
| ACTION REQUESTS | The configured action request types. Adding one creates an action request node on the canvas. |
| SETTINGS | Configuration nodes such as status updates and runtime input collection. |
| TOOLS & TASKS | Utility and processing nodes (e.g. email notifications, integrations). |
| SYSTEM & FLOW CONTROL | Logic and routing nodes that control workflow branching (e.g. AND nodes). |
A Search field at the top of the sidebar filters node types by name.
Canvas controls

Workflow canvas
| Control | Description |
|---|---|
| Zoom In | Increases canvas zoom level. |
| Zoom Out | Decreases canvas zoom level. |
| Fit View | Recentres and fits the entire workflow into the visible canvas area. |
| Toggle Interactivity | Locks or unlocks node movement. When locked, the canvas can be panned without risk of accidentally repositioning nodes. |
| Save Workflow | Saves the current state of the template. |
| Download Workflow as Image (right-click) | Right-clicking on the canvas background and selecting Download Workflow as Image exports the current canvas view as an image file. |
Node types
| Node type | Description |
|---|---|
| START POINT | The entry point of every workflow. Cannot be deleted. All workflows begin here. |
| Action Request node | Represents a configured action request step. Shows the step name, inputs (START POINT, USERS, DUE DATE, ADDITIONAL INPUTS), and outputs (the reply options for that action request). Includes a Configure button for per-node settings. |
| STATUS UPDATE | Updates the document status at this point in the workflow. |
| ALL REQUIRED (And node) | A convergence node. Behaviour is configurable per instance. |
Action Request node — Configure
Each Action Request node on the canvas includes a Configure button. Selecting it opens a settings dialog for that specific node instance.
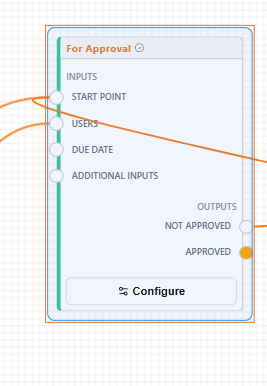
Action Request node showing Configure button
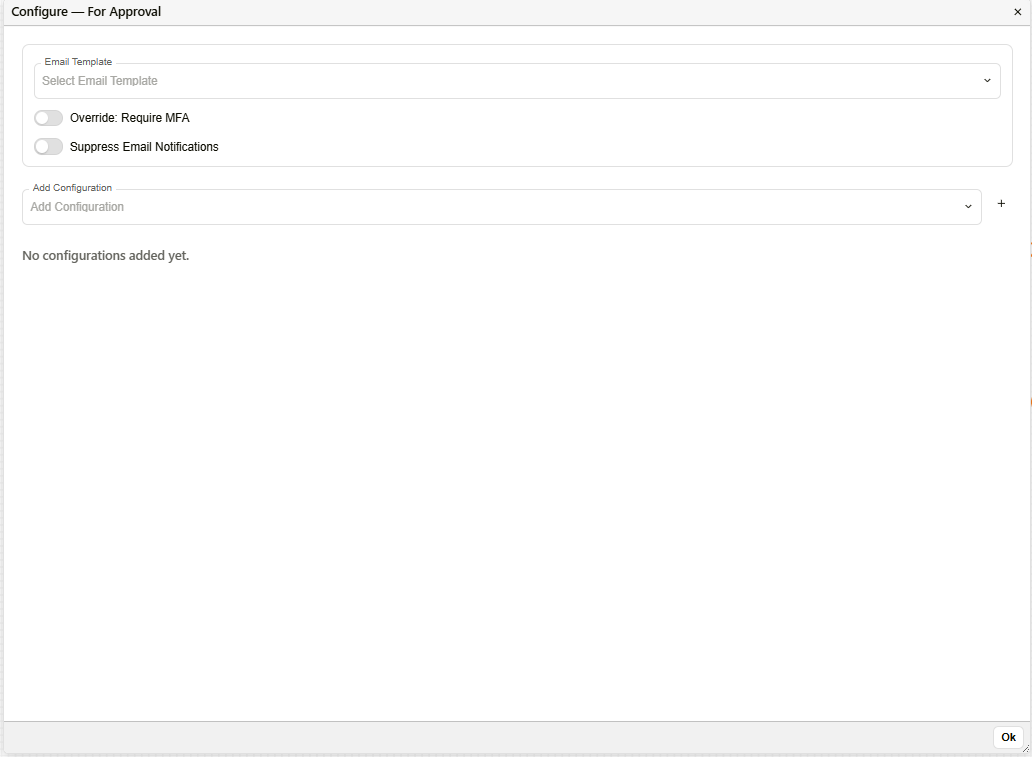
Configure dialog for an Action Request node
| Setting | Description |
|---|---|
| Email Template | The email template sent to participants when this step is triggered. Select from templates configured in Jinja Templates. If left blank, the system default is used. |
| Override: Require MFA | When enabled, participants must complete multi-factor authentication before they can submit a response for this step. |
| Suppress Email Notifications | When enabled, no notification email is sent when this action request step is triggered, regardless of the selected Email Template. |
| Add Configuration | Attaches one or more additional configuration objects to this node. Use the dropdown to select a type, then select + to add it. Available types: Assignee, Due Date, Workflow Initiation Input, Attachment Config Node, Custom Field Email, Custom Field User, Review Allocation, Review Transfer, Review Action, Review Action Reply Filter. |
And node options
The ALL REQUIRED node can be changed to one of three modes:
| Mode | Description |
|---|---|
| All required (And Node) | All incoming branches must complete before the workflow proceeds. |
| Only 1 (Cancel Node) | Once one branch completes, the remaining branches are cancelled and the workflow proceeds. |
| Passthrough (Placeholder Node) | Passes through without branching logic. Used as a structural placeholder. |
Versions tab
The Versions tab shows the version history of draft saves for the template. Users can review or restore previous draft states.
Example: basic approval workflow
The following example builds a two-node flow: a For Approval step that loops back to a For Correction step if the document is not approved.
Basic approval workflow — logic diagram
In the template editor, this flow looks as follows:
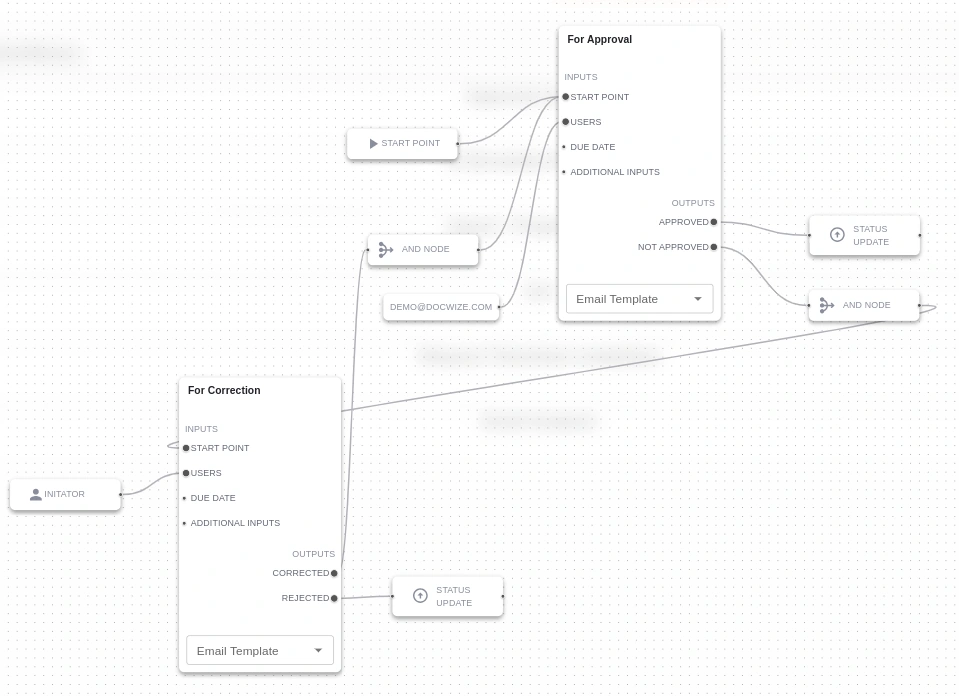
Example: basic approval workflow on canvas
A document enters at the Start node, moves to For Approval where the assigned participant reviews it. If approved, a Status Update node sets the document status to Approved. If not approved, the document moves to For Correction, where the initiator makes changes and resubmits. The cycle repeats until the document is either approved or rejected.
Example: building a 'For Approval' workflow
Workflow sections
Workflow sections allow users to label groups of nodes within a template, making the structure of complex workflows easier to read and audit. A section draws a visible boundary around a set of nodes and displays a label (e.g. "Internal Review", "External Review"). Sections can be renamed or deleted without affecting the nodes inside them.
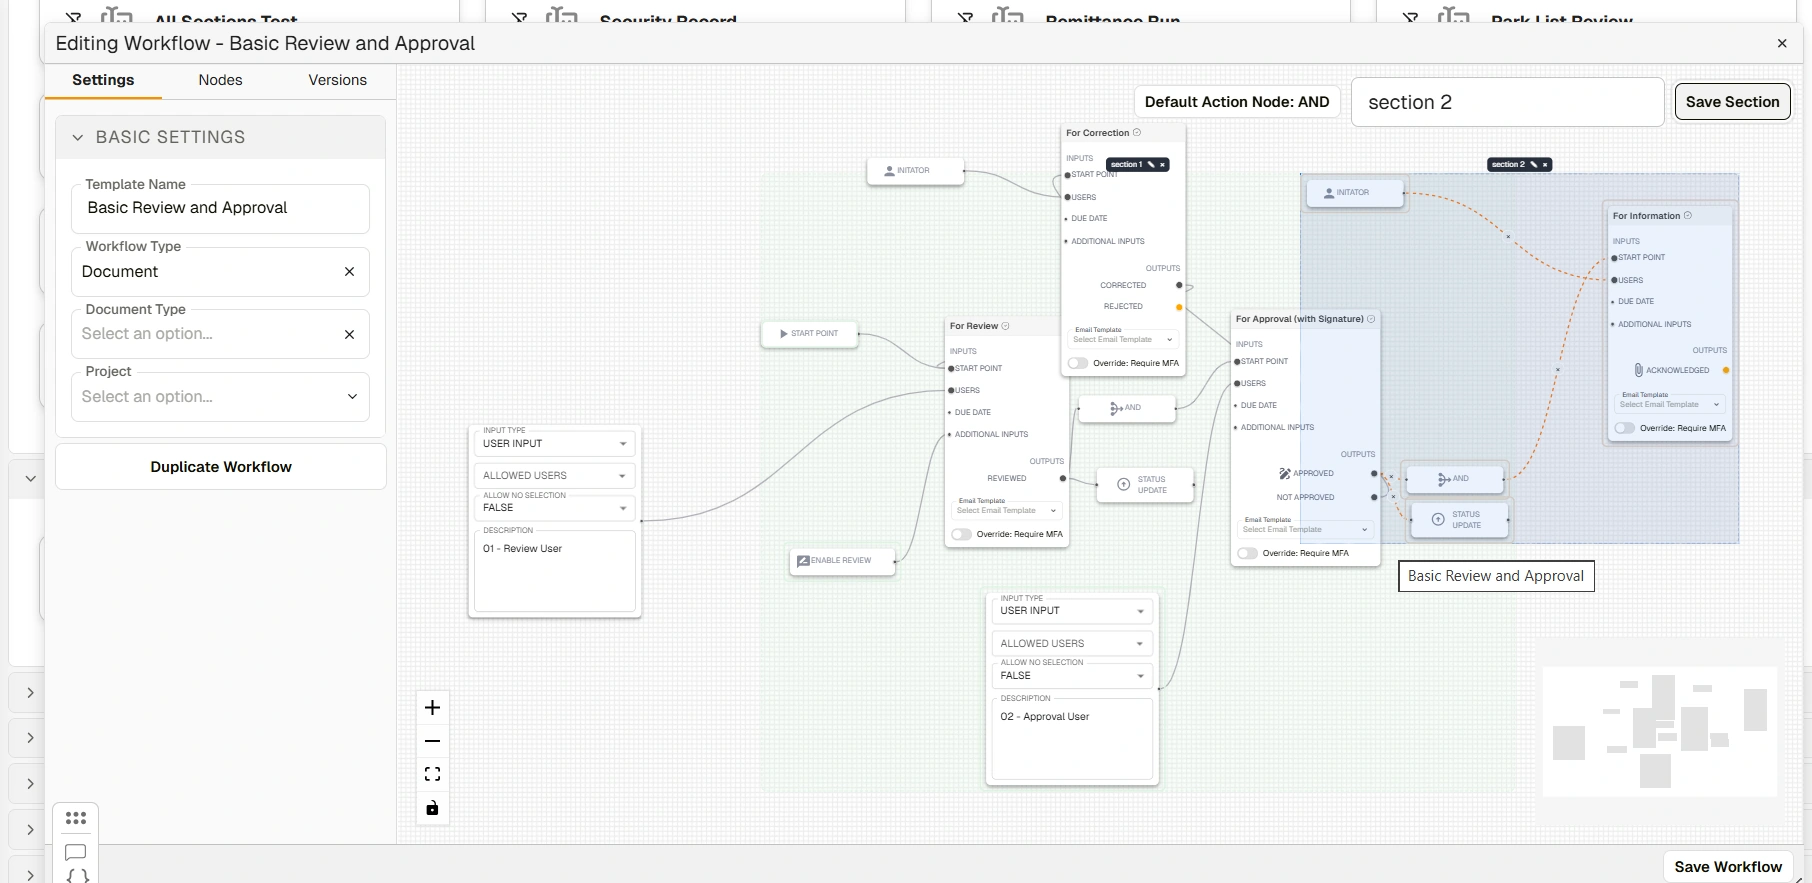
Example: workflow template with a section label
| Element | Description |
|---|---|
| Blue highlighted area | The workflow section boundary, drawn by shift-selecting nodes on the canvas. |
| Section Label | Text input for the section name. |
| Save Section | Saves the section name to the template. |
How to add a workflow section
Example: creating a workflow section
| Step | Description |
|---|---|
| 1 | Open the relevant workflow template in the editor and navigate to the Nodes tab. |
| 2 | Hold Shift and click to select the nodes that belong to the section. A blue area appears around the selection. |
| 3 | Enter a name in the Section Label field and click Save Section. |
Troubleshooting
| Risk | Detail |
|---|---|
| Saving without a template name | A template must have a name before it can be saved. |
| Deleting an enabled template | Disabling a template first is recommended before deleting, to confirm no active workflows depend on it. Templates in use by active workflows cannot be deleted. |
| Disconnected nodes | Nodes not connected to the start point or to any output path will not be reached during workflow execution. Verify all nodes are connected before enabling the template. |
| Scope conflicts | If both Document Type and Project are set, the template only appears for documents that match both conditions. Confirm scoping before enabling. |
Related configuration
- Workflows overview — introduction to the workflow configuration sequence
- Action Requests — configure the step types used as nodes in templates
- Testing and Launching Workflows — how to test a newly built template using the available launch routes