Testing and Launching Workflows
This page describes the entry points through which a workflow is started on a document or record. Understanding these routes is relevant for two purposes:
- Verification: users and implementation leads use these same routes to test a newly configured workflow template before enabling it for general use.
- Documentation: knowing each launch point helps confirm that the correct templates appear at each entry point.
Who uses this
Users testing a newly built template, and implementation leads confirming that workflows are available and correctly scoped for end users.
Before you start
- The workflow template must be created and saved in the template editor.
- The template must have its Enabled checkbox checked to appear in the template selection dropdown.
- If the template is scoped to a specific document type or project, test using a document that matches that scope.
Workflow launch routes
A workflow can be started from three entry points. All three routes open the same Assign Template Workflow dialog.
| Route | How to access |
|---|---|
| Right-click on a document | In the Explorer, right-click a document row. Select Workflow from the context menu. |
| Document Details dialog | Open a document's details panel and navigate to the Workflow section. Select New Workflow Template to open the dialog. |
| Record submission | When a record template is configured to trigger a workflow on submission, the dialog is presented as part of completing the record. |
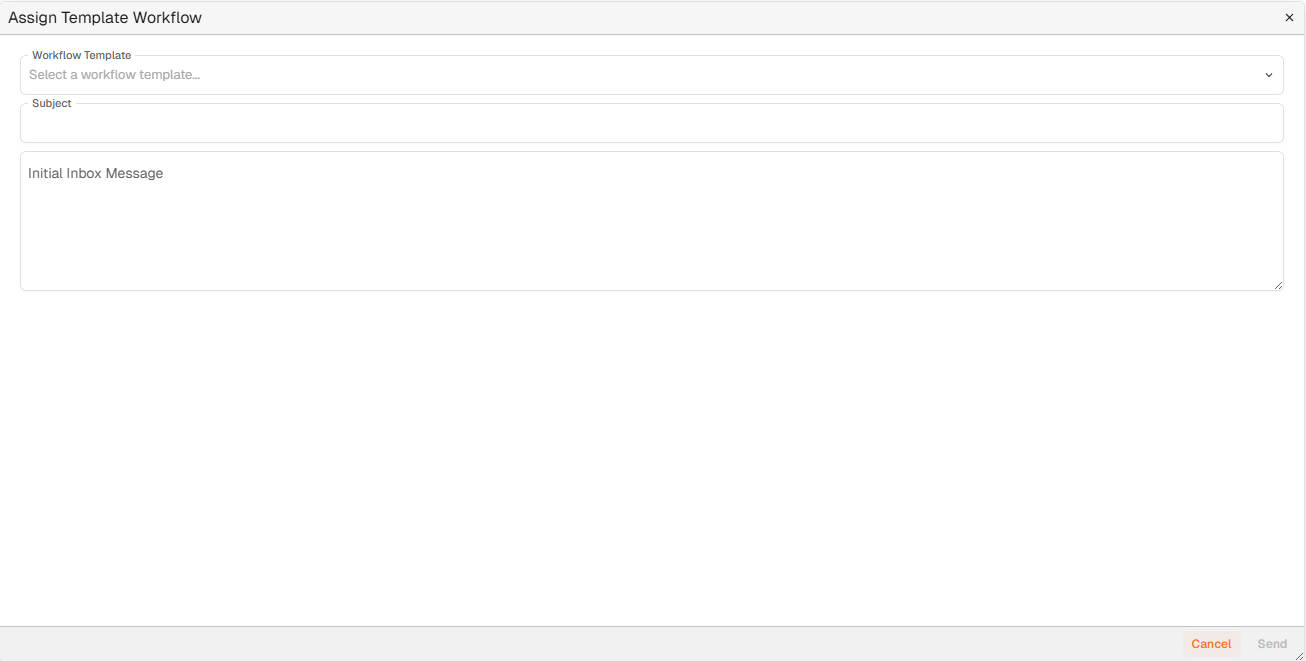
'Assign Template Workflow' dialog
The Assign Template Workflow dialog is opened from any of the three routes above.
'Assign Template Workflow' dialog
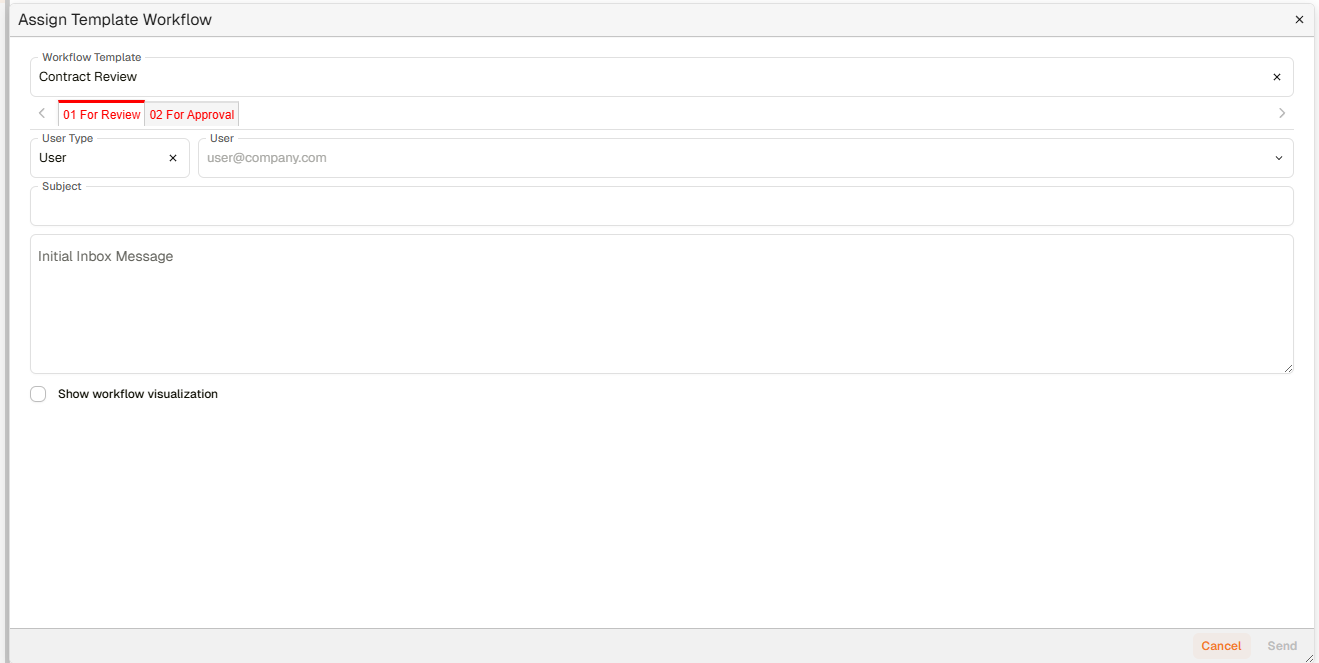
'Assign Template Workflow' dialog — with runtime user assignment
| Field | Description |
|---|---|
| Workflow Template | Dropdown listing all enabled workflow templates the initiator has permission to use. Only templates matching the document type and project scope (if configured) appear here. |
| Subject | Optional. A short subject line for the workflow, displayed in the inbox alongside the workflow item. |
| User | Conditional. If the selected template requires runtime user assignment, one or more user selection fields appear here. In some templates, recipients are preconfigured and this field does not appear. |
| Initial Inbox Message | Optional. A message included with the workflow, visible in the inbox sidebar when recipients open the item. |
| Show workflow visualization | Optional checkbox. When checked, the workflow diagram is displayed to the initiator before the workflow is sent. |
| Cancel | Closes the dialog without starting the workflow. |
| Send | Starts the workflow. The button is disabled until a workflow template is selected. |
How to test a workflow template
Use the following steps to verify that a newly built template behaves as expected before enabling it for general use.
Overview: starting a workflow
| Step | Description |
|---|---|
| 1 | Confirm the template is enabled in New > Workflow Setup > Templates. |
| 2 | Locate a suitable test document in the Explorer — one that matches the template's document type and project scope if applicable. |
| 3 | Right-click the document and select Workflow to open the Assign Template Workflow dialog. |
| 4 | In the Workflow Template dropdown, confirm the new template appears. If it does not, verify the template is enabled and that the document matches any configured scope. |
| 5 | Select the template. If the template requires runtime user assignment, a User field appears — select the appropriate test recipient. |
| 6 | Enter a subject and optional inbox message, then click Send. |
| 7 | Navigate to the inbox as the assigned recipient and confirm the action request arrives with the correct step name and reply options. |
| 8 | Complete the step using one of the reply options and confirm the workflow routes correctly to the next node. |
| 9 | Repeat for each branch in the workflow until all paths are verified. |
Troubleshooting
| Issue | Detail |
|---|---|
| Template does not appear in the dropdown | The template may be disabled, or the document does not match the template's Document Type or Project scope. Check both conditions in the template editor. |
| User field does not appear when expected | If the template requires runtime user selection but no field appears, the template may have pre-assigned users configured. Review the node inputs in the template editor. |
| Workflow starts but no inbox item appears | The recipient may not have Inbox module access, or the action request's email notification may not be configured. Check group licences and email template settings. |
| Wrong template visible to users | If a template is appearing for the wrong document type or project, review the Document Type and Project scope settings on the template's Settings tab. |
Related configuration
- Building Workflow Templates — create and configure the template before testing
- Action Requests — configure the step types used in templates
- Workflows overview — introduction to the full workflow configuration sequence
- Groups — manage Inbox module access for user groups