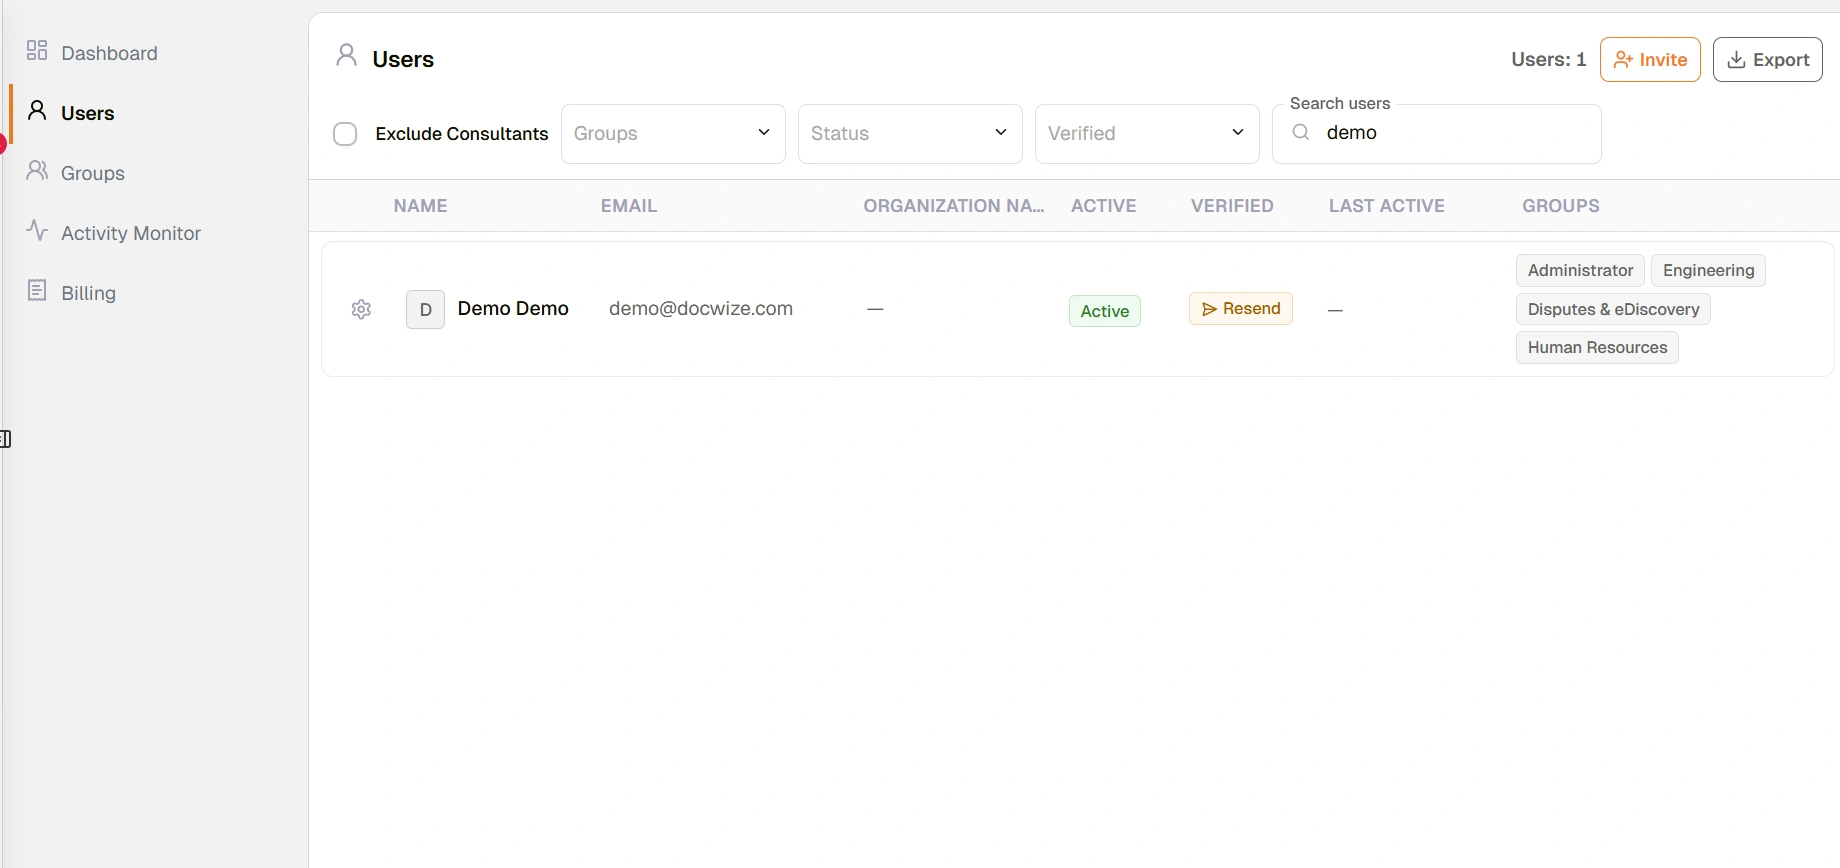
The Users page is where users manage user accounts in the database. It provides a user register with filtering and search tools, and quick actions for inviting, reviewing, and updating users.
Users with the Group and User Admin permission (assigned via Admin Console Permissions). The Users page is accessible from Admin Console > Users.
Users page
Users page
| Control | Description |
|---|
| Users count | Shows the total number of users matching the current filter. |
| Invite | Opens the dialog to add one or more new users. |
| Export | Exports the user register as a CSV file. |
| Exclude Consultants | When checked, hides users marked as consultants (Docwize staff or partners who access client systems). |
| Groups | Filters users by the selected group. |
| Status | Filters users by status — for example, active or inactive. |
| Verified | Filters users by verification status — for example, verified or unverified. |
| Search users | Searches for a user by name or email address. |
User register
Each row in the user register represents one user account.
| Column | Description |
|---|
| Settings (gear icon) | Opens the Settings dialog for that user. |
| Initial badge | A letter badge identifying the user by their first initial. |
| Name | The user's display name. |
| Email | The user's email address. |
| Organization Name | The organisation the user belongs to, where configured. |
| Active | Indicates whether the user is active. Active users have access to Docwize and are counted as billable where applicable. |
| Verified | Indicates whether the user has completed verification. A Resend button appears for users who have not yet verified, allowing the invitation to be resent. |
| Last Active | The date and time the user was last active in the database. |
| Groups | The groups the user belongs to, shown as pill badges. |
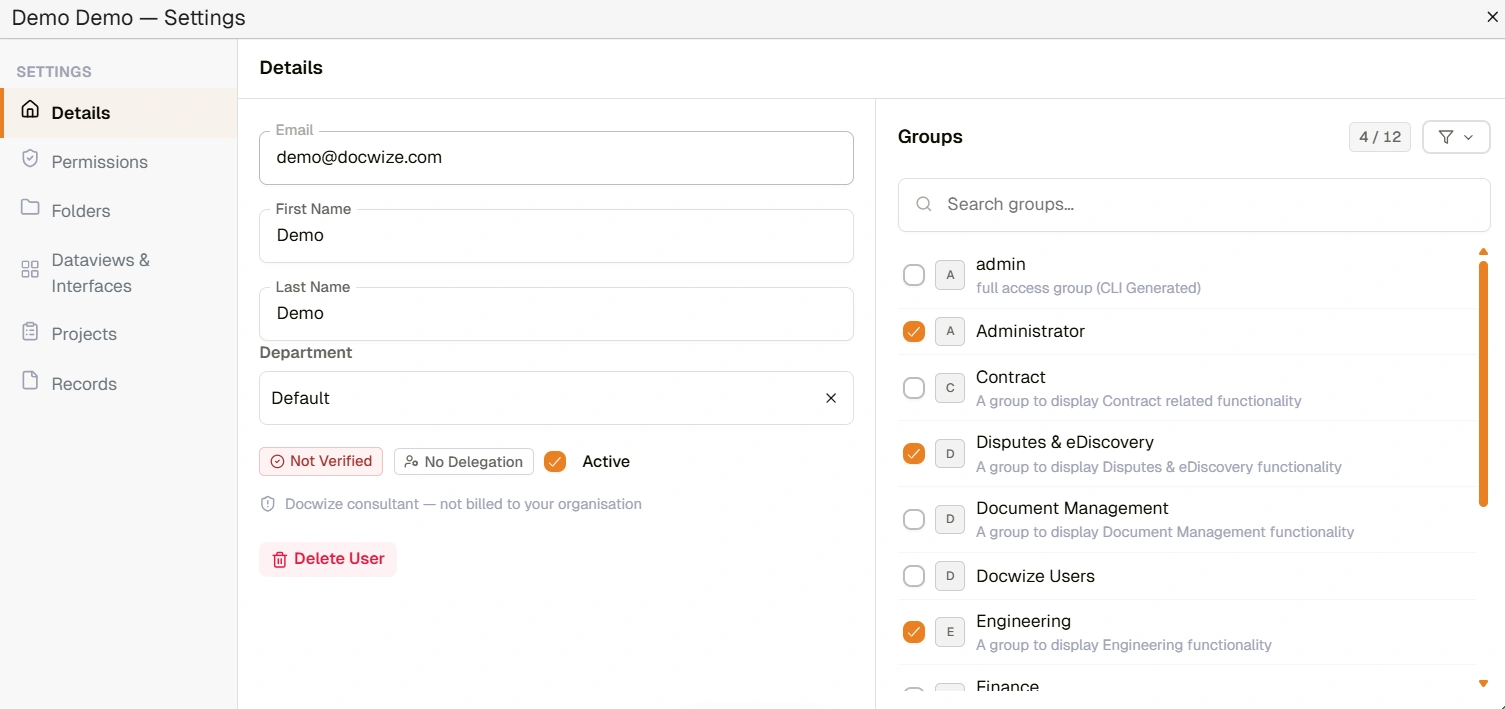
User Settings dialog
Clicking the gear icon next to a user opens the Settings dialog. It is arranged as a tabbed view with the following sections accessible from the left-hand navigation:
User Settings dialog
| Section | Description |
|---|
| Details | User profile, status, group membership, and delegation settings. |
| Permissions | Permission settings for the user. Permissions inherited from groups are greyed out. See Permissions. |
| Folders | Folder access assigned to the user. See Access Control. |
| Dataviews & Interfaces | Dataview and interface access for the user. |
| Projects | Project access for the user. |
| Records | Records access for the user. |
Details section
The Details section is divided into a main form on the left and a Groups panel on the right.
User profile
| Field | Description |
|---|
| Email | The user's email address. Cannot be edited. |
| First Name | The user's first name. |
| Last Name | The user's last name. |
| Department | The user's department. Selected from a dropdown. |
| Company | The organisation the user belongs to. Selected from a dropdown. |
| Verified | Shows whether the user has completed verification. |
| No Delegation / Delegation active | Shows the user's current delegation status. Click to open the Delegate Workflows dialog. |
| Active | When checked, the user is active and has access to Docwize. Active users are counted as billable where applicable. |
| External User | When checked, marks this user as a Flexi-User. Flexi-User Access provides occasional external access billed per login day at 10% of the equivalent standard user licence rate, capped at the price of a full standard user licence. |
| Delete User | Removes the user from the database and revokes their access. |
Groups panel
The right-hand panel lists all groups in the database. Checked groups indicate current membership. Membership can be updated directly from this panel.
| Control | Description |
|---|
| Groups count | Shows checked groups against total groups (e.g. "4 / 12"). |
| Filter | Filters the groups list. |
| Search groups | Searches groups by name. |
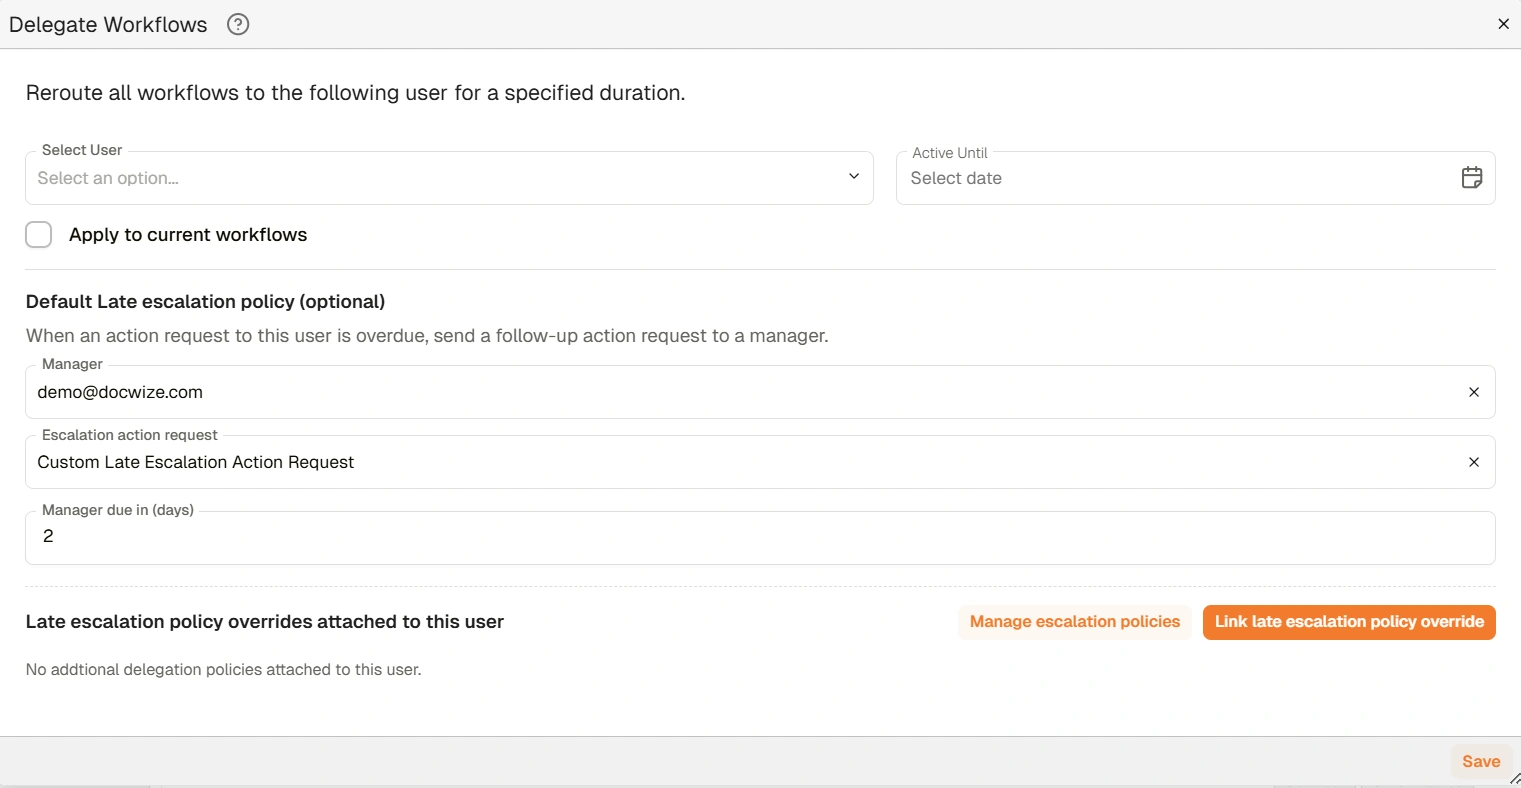
Delegating workflows & late escalation
The Delegate Workflows dialog lets users temporarily reroute workflow items assigned to a user and configure what should happen when that user's action requests become overdue. This is useful when a user is on leave or temporarily unavailable.
Delegating workflows
| Field | Description |
|---|
| Select User | The delegate who will receive new workflow items while delegation is active. |
| Active Until | The end date for delegation. After this date the system stops rerouting new workflow items. |
| Apply to current workflows | When enabled, open workflow items already assigned to the user are also handed over to the delegate. When disabled, only new items created after saving are delegated. |
Default late escalation policy
Late escalation controls what happens when an action request assigned to the user becomes overdue. If configured, the system automatically creates a follow-up action request for a manager.
| Field | Description |
|---|
| Manager | The manager who should receive the follow-up action request. Leave blank to disable escalation. |
| Escalation action request | The action request template to use for the escalation. |
| Manager due in (days) | The number of days the manager has to complete the escalated request. Leave blank to use workflow defaults. |
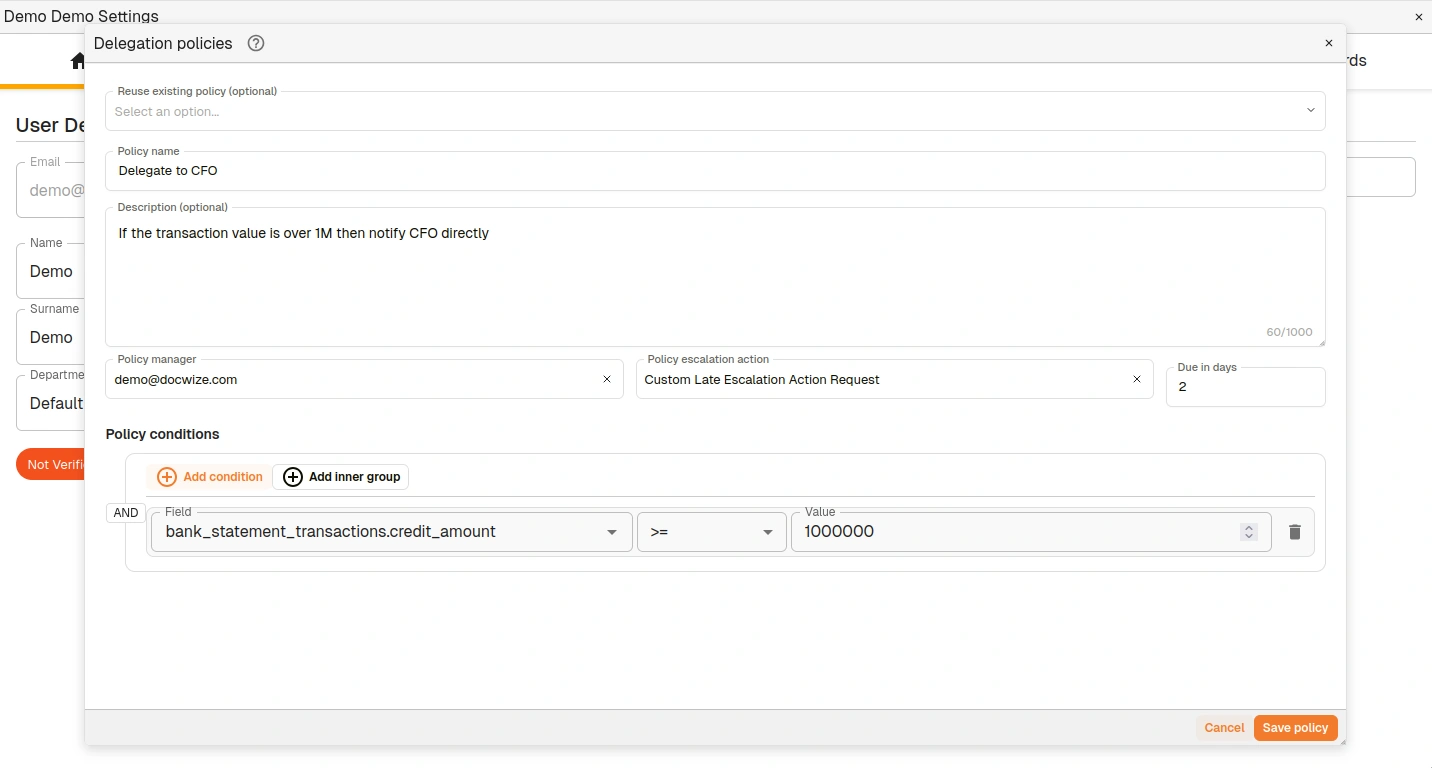
Late escalation policy overrides
Late escalation policy overrides define conditional overrides that apply only when their conditions match a workflow item — for example, based on document type or value. These overrides are reusable across users.
| Field / Control | Description |
|---|
| Manage escalation policies | Opens the policy editor where escalation policy overrides can be created, reused, or deleted. |
| Link late escalation policy override | Attaches an existing policy override to the current user. Only linked overrides are evaluated for this user. |
| Policy name / description | Identifies the rule's purpose for other users. |
| Policy manager / escalation action / due in days | Late escalation settings applied when the policy matches. |
| Policy conditions | A rule expression that determines when the policy should trigger. |
How to invite a user
| Step | Description |
|---|
| 1 | Navigate to Admin Console > Users. |
| 2 | Click Invite. |
| 3 | Enter the user's email address and assign them to one or more groups. |
| 4 | Send the invitation. The user appears in the register with Resend in the Verified column until they accept. |
How to bulk invite users
The Invite User(s) dialog supports inviting multiple users at once using CSV import or by adding rows directly in the dialog.
CSV import method
| Step | Description |
|---|
| 1 | Navigate to Admin Console > Users. |
| 2 | Click Invite. |
| 3 | Click Sample CSV to download a template. |
| 4 | Open the CSV file and add user data in the following columns: Email Address, Username / Prefix (optional), Department (optional), Company (optional). Each row is one user. |
| 5 | Save the file. |
| 6 | In the Invite dialog, click Drop CSV and select your file. Users from the CSV will populate the invite form. |
| 7 | Assign all users to one or more groups using the ASSIGN TO GROUPS panel on the right. Use Apply to all to apply groups to every user being invited. |
| 8 | Click Invite [N] Users. |
Add Row method
| Step | Description |
|---|
| 1 | Navigate to Admin Console > Users. |
| 2 | Click Invite. |
| 3 | Click + Add Row to add another user entry to the form. Repeat for each user. |
| 4 | Fill in the details for each user: Email Address, Username / Prefix (optional), Department (optional), Company (optional). |
| 5 | Assign all users to one or more groups using the ASSIGN TO GROUPS panel on the right. Use Apply to all to apply groups to every user being invited. |
| 6 | Click Invite [N] Users. |
All invited users will appear in the register with Resend in the Verified column until they accept their invitations.
How to assign a user to a group
| Step | Description |
|---|
| 1 | Navigate to Admin Console > Users and click the gear icon next to the user. |
| 2 | In the Groups panel on the right, check the groups the user should belong to. |
| 3 | Save. |
How to delegate a user's workflows
| Step | Description |
|---|
| 1 | Navigate to Admin Console > Users and click the gear icon next to the user. |
| 2 | In the Details section, click the No Delegation badge to open the Delegate Workflows dialog. |
| 3 | Select a delegate user and set an Active Until date. |
| 4 | Enable Apply to current workflows if open items should also be transferred. |
| 5 | Save. |
Troubleshooting
| Risk | Detail |
|---|
| User cannot access a module | Check that the user's group has the relevant licence enabled. Module access requires both a licence and the appropriate permissions. |
| User can see documents they should not | Check group membership and folder access. A user in a group with broad folder access inherits that access. Review via Access Control. |
| Resend button not appearing for unverified users | Confirm the user's email address is correct. The Resend button appears in the Verified column for users who have not completed verification. |
| Deleting a user cannot be undone | Deleted users lose all access and are removed from all groups. If the user's access needs to be revoked temporarily, set them to inactive instead. |
| Delegation not stopping after the Active Until date | Delegation stops rerouting new items after the set date, but items already delegated before that date are not automatically returned. Review open workflow items manually after delegation ends. |
- Admin Console — overview of all Admin Console areas
- Groups — create and manage groups; assign group-level permissions and module licences
- Permissions — full reference for all available permissions and how they are assigned
- Access Control — folder security, project security, and document-level access