Completing Action Requests
When a workflow reaches a step that requires user input, an action request is sent to the assigned user. The user receives an email notification and the request appears in their Docwize Inbox under User Tasks.
Action requests can require different types of work depending on how the workflow was configured — for example, signing a document, annotating, reviewing, or filling in custom fields.
Finding your action requests
Open the Inbox and select the User Tasks tab. Action requests are listed in the left sidebar, grouped by workflow. Click a workflow to expand it and see the documents it contains.
The top of the central panel shows sub-tabs for filtering:
| Sub-tab | What it shows |
|---|---|
| All | All action requests, regardless of status |
| Pending | Requests not yet started |
| Incomplete | Requests opened but not yet submitted |
| Sent | Requests you have sent to others |
| Complete | Requests you have already submitted |
Action request cards labelled Manual were added outside of a regular workflow. They are completed in the same way as standard action requests.
The action request card
Each action request appears as a card in the central panel. The card shows:
| Field | Description |
|---|---|
| Action type label | The type of action required — for example, For Approval (with Signature), For Review. |
| Sent date | When the action request was sent. |
| From | The user who initiated the request. |
| To | The user assigned to complete the request. |
| Due | The due date. Overdue requests show the number of days overdue in red. |
| Complete | Opens the document so the action can be completed. |
| ⋮ (three dots) | Opens additional options for the card. |
Card options (⋮ menu)
| Option | Description |
|---|---|
| Replace user | Reassigns the action request to a different user. Use this to delegate the request when you are unable to complete it. |
| Replay action | Resends the action request. |
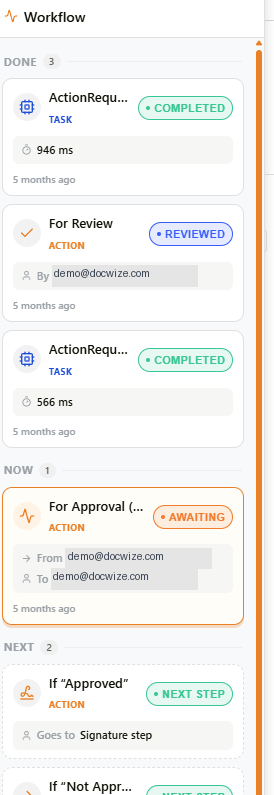
Workflow summary rail
When a document is opened from an action request, the document viewer includes a Workflow panel summarizing the document's progress through its workflow. The panel is split into three sections:
| Section | Description |
|---|---|
| DONE | Steps already completed, including task duration and how long ago each was completed. |
| NOW | The action currently awaiting a response, including who it's from, who it's assigned to, and when it was sent. |
| NEXT | The likely next step(s), shown per possible response (for example, what happens if the current action is approved versus not approved). |
Workflow summary rail
How to complete an action request
| Step | Description |
|---|---|
| 1 | Navigate to Inbox and select the relevant workflow from the left sidebar. |
| 2 | Click the relevant document to view its action request cards in the central panel. |
| 3 | Click Complete on the action request card. The document opens in the document viewer. |
| 4 | Complete the required action — for example, sign, annotate, review, or fill in fields. See the sections below for specific action types. |
| 5 | Click Complete Action in the bottom-right corner. A dropdown appears with the available responses for this workflow step — for example, Approved, Not Approved, or Reviewed. Select the appropriate response. |
| 6 | Click Submit to confirm. The workflow advances to the next step. |
If the workflow contains more than one document, a dialog appears after submitting asking whether to proceed to the next document. Select Yes to continue or No to return to the inbox and complete the remaining documents separately.
Some action requests are configured with required fields. A required field's label shows (required) next to it, and Submit is blocked until it has been filled in.
Other inbox controls
| Control | Description |
|---|---|
| Visualize Flow | Opens a diagram of the workflow, showing all steps and their current status. |
| Add Action Request | Creates an ad hoc action request outside of a structured workflow. Requires the Adhoc Action Requests permission. |
| View Activities | Shows a log of activity for the selected workflow. |
How to complete annotating, stamping, and reviewing
Some workflows require you to annotate, stamp, or review a document before submitting.
| Step | Description |
|---|---|
| 1 | Click Complete on the action request card to open the document. |
| 2 | Use the Annotations toolbar to annotate as needed. |
| 3 | Select and place a stamp as needed. |
| 4 | To review a document in Office Online, open it and proceed as required. Alternatively, use the document viewer's right-click menu to highlight, delete, or add notes. |
| 5 | Click Complete Action, select the relevant response, and click Submit. |
How to complete the Capturing Custom Fields action request
Some workflows require you to verify, edit, or enter information into custom fields. Depending on the workflow configuration, some fields may be read-only or hidden at this step. Custom field data may appear in form or grid format.
Form format
| Step | Description |
|---|---|
| 1 | Click Complete on the action request card to open the document. |
| 2 | Complete the relevant fields in the form. |
| 3 | Click Save Changes to save the input. |
| 4 | Click Complete Action, select the relevant response, and click Submit. |
Grid format
| Step | Description |
|---|---|
| 1 | Click Complete on the action request card to open the document. |
| 2 | Click the Edit icon on the relevant fields and enter the required information. |
| 3 | Click Complete Action, select the relevant response, and click Submit. |
Related pages
- Signing action requests — step-by-step guide for digital signature action requests
- Annotations — how to annotate documents during review
- Stamps — how to apply stamps during review
- Action requests (config) — how administrators configure action request types and responses