Custom Field Templates
Custom field templates define the structure of the metadata captured on documents. Each template is a collection of field entries — individual columns of data such as dates, reference numbers, line items, or lookup values. Templates are typed (Grid, Grid Link, or Filter) and can be scoped to specific document types.
Before creating a template, identify the required field names, field types, and whether the template needs to support multiple entries (one-to-many) or shared linked entries (many-to-many). See Custom Field Relationships for guidance on template types.
Who configures this
Users with access to the New module. The Custom Fields area is accessible from New > Custom Fields & Configuration > Custom Fields.
Before you start
- Determine the template type (Grid, Grid Link, or Filter) before creating the template. Template type affects how data is stored and displayed.
- Identify all required field names and field types before building the template. Changing field types after data has been captured is validated against existing data and may be rejected.
- If the template will use LookupList or LookupListMulti field types, configure the relevant lookup lists first. See Lookup Lists.
Edit Custom Fields panel
The Edit Custom Fields panel lists all custom field templates in the database. It is opened from New > Custom Fields & Configuration > Custom Fields.
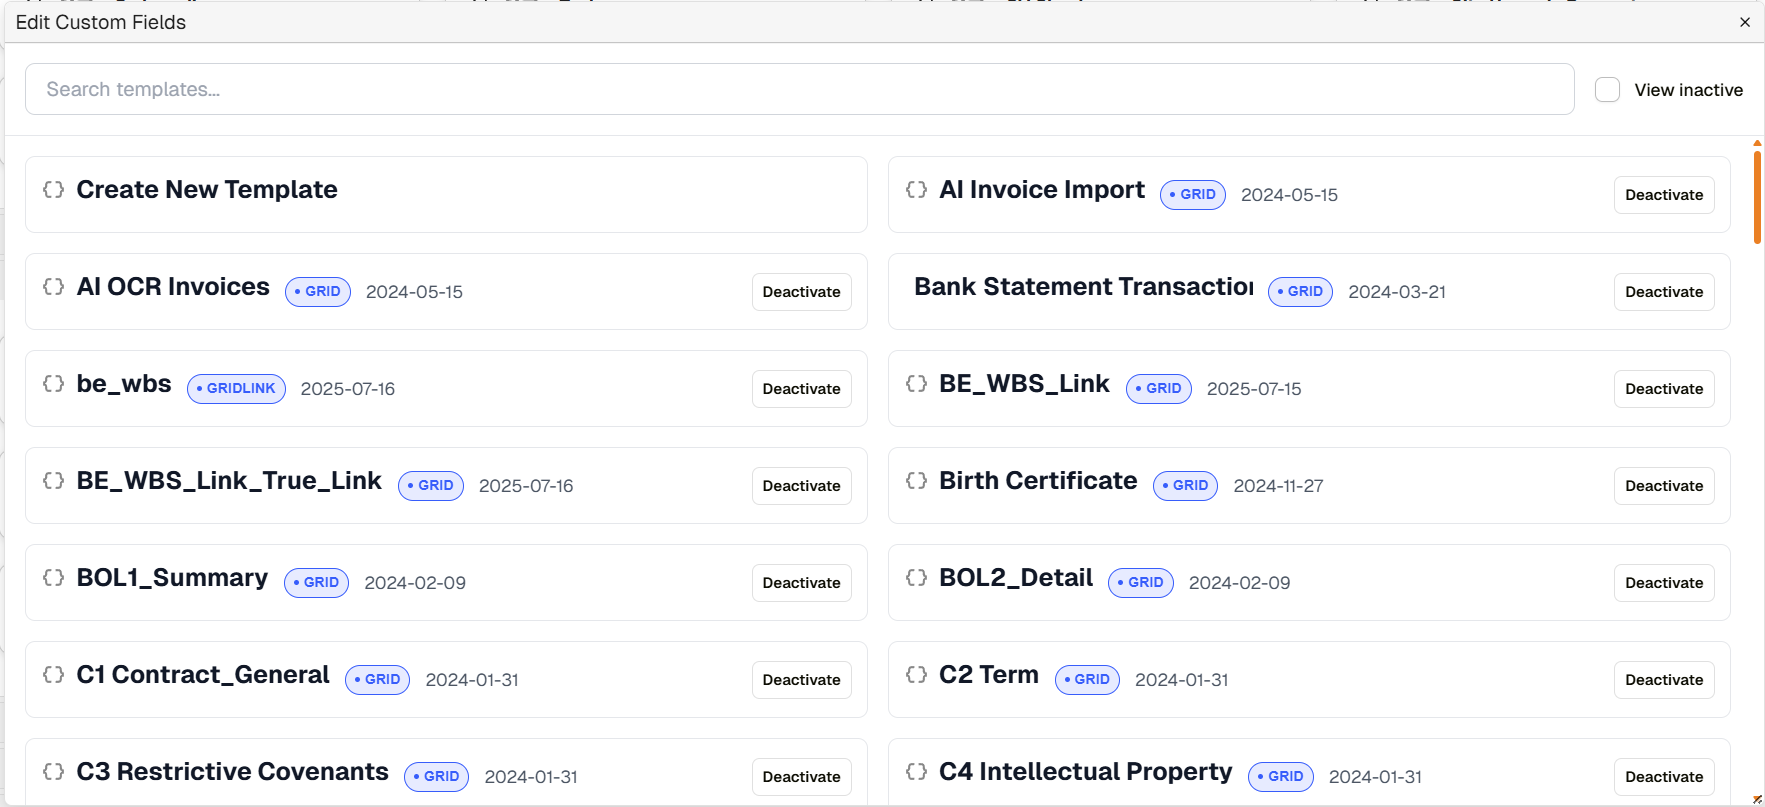
'Edit Custom Fields' panel
| Control | Description |
|---|---|
| Search templates... | Filters the template list by template name. |
| View inactive | When checked, inactive templates are included in the list. By default, only active templates are shown. |
| Create New Template | Opens the template editor to configure a new custom field template. |
Each template card in the list shows:

Template list entry
| Element | Description |
|---|---|
| Template name | The name of the template. |
| Type badge | Identifies the template type: Grid, Grid Link, or Filter. |
| Date | The date the template was created. |
| Deactivate / Activate | Deactivates or activates the template. Inactive templates are hidden from document views unless View inactive is checked. |
Template editor
Clicking Create New Template opens the Create New Custom Field Template editor. Clicking an existing template card opens the Edit Custom Field Template editor. Both use the same layout: a field entries area on the left and a settings sidebar on the right.
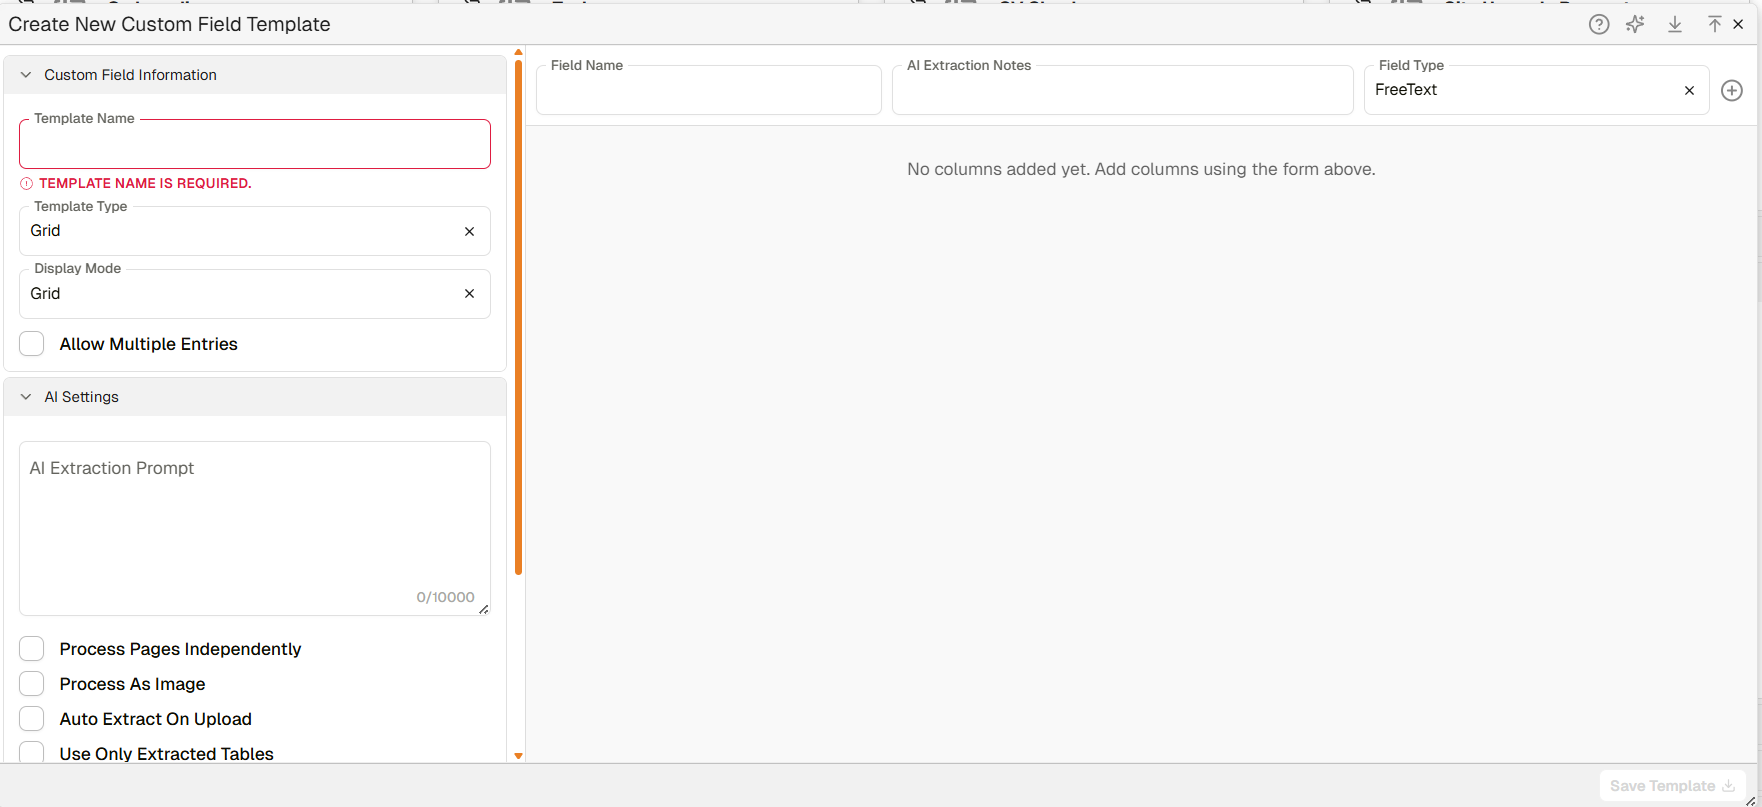
Template editor
Toolbar
The toolbar at the top right of the editor contains the following controls:
| Control | Description |
|---|---|
| Help | Opens contextual help for the template editor. |
| Auto Import Columns | Imports column definitions from a previously exported custom field definition file. |
| Propagate Changes to Views | Propagates template structure changes to downstream virtual views. |
| Delete Custom Field Template | Deletes the template. Templates that have existing data associated with them should be deactivated rather than deleted. |
| Export Template Definition | Exports the template structure as a file, for use when importing into another template. |
| Import Template Definition | Imports a template structure from a previously exported definition file. |
Custom Field Information
| Field | Description |
|---|---|
| Template Name | The name of the template. Required — the template cannot be saved without a name. |
| Template Type | Sets the type of template: Grid (one-to-one or one-to-many), Grid Link (many-to-many), or Filter. See Custom Field Relationships. |
| Display Mode | Sets how the template is presented when capturing data: Form (single-entry layout) or Grid (tabular multi-entry layout). |
| Allow Multiple Entries | When enabled, the template allows more than one row of data to be added per document. Available when Display Mode is set to Grid. |
AI Settings
| Field | Description |
|---|---|
| AI Extraction Prompt | A prompt directing AI extraction for the template as a whole. Describes the extraction task and any relevant instructions. Maximum 10,000 characters. |
| Process Pages Independently | When enabled, each page of the document is sent to the AI separately rather than as a single combined prompt. |
| Process As Image | When enabled, each page is passed as an image alongside the page text during AI extraction. |
| Auto Extract On Upload | When enabled, AI extraction runs automatically when a document is uploaded to the database. |
| Use Only Extracted Tables | When enabled, AI extraction draws only from tabular data extracted from the document. Useful for structured documents such as invoices. |
Access Options
| Field | Description |
|---|---|
| Allowed Document Types | Restricts the template to specific document types. If left empty, the template is available for all document types. Use Select All or Clear All to manage the selection. |
Advanced Options
| Field | Description |
|---|---|
| View Name | Sets the name of the virtual view associated with this template. |
| Column Name Renderer | Specifies an alternative renderer for column names in the template's data view. |
Adding field entries
Field entries define the individual columns of data captured by the template. The add-entry row at the top of the field entries area contains:
| Control | Description |
|---|---|
| Field Name | The name of the field entry (for example: Invoice Date, PO Number, Line Amount). |
| AI Extraction Notes | Instructions for the AI to follow when extracting data into this specific field. |
| Field Type | The data type for this field. See Field types below. |
| + | Adds the configured field entry to the template. |
Field types
The following field types are available in the Field Type dropdown. Some types expose additional configuration options when selected in the expanded field entry view.
| Field Type | Description |
|---|---|
| Text | Single-line plain text. |
| FreeText | Multi-line plain text. |
| Date | Date value. |
| DateTime | Date and time value. |
| Checkbox | Boolean true/false toggle. |
| Combo | Single-select dropdown with predefined options. |
| Numeric | Decimal number value. |
| WholeNumber | Integer (whole number) value. |
| Currency | Monetary value. |
| URL | A web address, displayed as a clickable hyperlink when viewed. |
| Signature | Digital signature capture. |
| Image | Image upload and display. The field renders as a thumbnail in forms and grids with Replace and Remove options. |
| Notes | Extended text entry. |
| Notepad | Rich text editor supporting text styling, bullet lists, and image pasting. |
| Hidden | Stores data but is not displayed to users when the template is viewed. |
| GeoLocation | Geographic location value. |
| MultiValue | Allows multiple values to be entered for a single field. |
| Calculated | A field whose value is computed from other field values using a configured expression. |
| MatrixCalculation | |
| LinkedColumn | Links this column to a column in the same or a different template. The target template and column are selected when the field is configured. |
| LookupList | Single-select dropdown populated from a configured lookup list. See Lookup Lists. |
| LookupListMulti | Multi-select dropdown populated from a configured lookup list. |
| ContactsLookup | Lookup value sourced from the Contacts module. |
| CustomDataLookup | Lookup value sourced from custom data. |
| VirtualCustomFieldLookup | Lookup value sourced from a configured interface. Differs from LookupList in that values are interface-based rather than SQL-based. |
| CustomFieldReference | Links this column to rows in another custom field template, enabling related data from different templates to be grouped and viewed together on a document. To configure, select CustomFieldReference as the field type and choose the target template from the picker that appears. |
| GridLinkReference | Creates a relational reference to a record in a GridLink register template. Select the target register template the field points to (e.g. an Employee register). Enable Display value on the GridLink template's field to show a human-readable value from the linked record (e.g. an employee name) rather than an internal identifier. |
| SequentialRef | Generates a unique, incrementing sequential reference code for each record (for example, INV-0001). The format is configured when the field is set up. |
Expanded field entry options
Each field entry that has been added to the template can be expanded by clicking the chevron (∧) on the right of the entry. The following options are available:
| Field / Control | Description |
|---|---|
| ⠿ (drag handle) | Reorders the field entry by dragging. Changes the order fields appear in the template. |
| ∧ / ∨ | Expands or collapses the field entry options. |
| Delete (bin icon) | Deletes the field entry from the template. |
| Field Name | The name of this field entry. Editable after the field has been added. |
| Field Type | The data type. Changing the type on a field that already contains data is validated against existing data before the change is applied. |
| Caption (Optional) | An optional label displayed alongside the field when the template is in use. |
| AI Extraction Notes | Extraction instructions specific to this field. Maximum 5,000 characters. |
| Required | When enabled, this field must be completed before the document or record can be saved. |
| Load On Demand | When enabled, lookup values for this field are loaded only when the field is opened, rather than at page load. |
| Extraction Page Identifier | When enabled, the field records the page number from which AI extraction occurred. Relevant when extracting data on a per-page basis. |
| Template Section | Optional. Assigns the field to a named section within the template, useful when organising fields in record layouts. |
Additional options may appear depending on the selected field type — for example, list name configuration for LookupList field types.
How to create a custom field template
| Step | Description |
|---|---|
| 1 | Navigate to New > Custom Fields & Configuration > Custom Fields. |
| 2 | Click Create New Template. |
| 3 | Enter a Template Name and select the Template Type and Display Mode. Enable Allow Multiple Entries if the template requires multiple rows per document. |
| 4 | Configure AI Settings and Access Options as required. |
| 5 | In the field entry row, enter a Field Name, add AI Extraction Notes if relevant, and select the Field Type. Click + to add the field to the template. |
| 6 | Repeat step 5 for each required field entry. Use the drag handle to reorder entries as needed. |
| 7 | Click Save Template. |
Overview: creating a custom field template
Troubleshooting
| Risk | Detail |
|---|---|
| Template cannot be saved | A template name is required. The editor displays "TEMPLATE NAME IS REQUIRED." if the name field is left blank on save. |
| Field type change rejected | Changing the type of a field that already contains data is validated against existing data. If existing data is incompatible with the new type, the change is not applied. |
| Template not appearing on documents | Check that the template's Allowed Document Types includes the relevant document type, or that no restriction has been set. |
| Inactive template not visible | Inactive templates are hidden by default. Check View inactive in the Edit Custom Fields panel to confirm the template exists but is inactive. |
| LookupList field shows empty dropdown | The lookup list referenced by the field must be configured and populated before the field is put into use. See Lookup Lists. |
Related configuration
- Custom Fields overview — introduction to the custom fields configuration sequence
- Custom Field Relationships — how template types relate to documents
- Lookup Lists — configure lookup lists used with LookupList and LookupListMulti field types
- Manage Registers — view and populate Grid Link templates