Annotations
Docwize allows you to annotate documents. This means that shapes, text boxes, images and notes can be added to the document. In addition, you can add static and dynamic stamps to documents. When you select to preview a document, the most recent version of the document is automatically opened.
Annotations are saved as you add them, so there is no save button to remember. Each annotation can also carry its own thread of notes, which is useful when a reviewer needs to explain why something was marked up.
What you can do in Annotations
- Access annotation tools from the preview window
- Draw lines, rectangles, circles, arrows and clouds on a document
- Add text boxes and images to a document
- Set the default colour and font size for new annotations
- Add notes to any annotation, and reply to existing notes
- Delete or duplicate an annotation
- Undo and redo your changes
- Draw several shapes in a row with Keep the tool selected after drawing
- Select several annotations at once, and zoom in on an area of the page
- Create a signature and sign a document
- Add your name, the date or custom text with Signature Text
- Mark where a signature should go with a signature field
- Use stamp collections while annotating
- View every annotation on the document in the review panel
- Burn annotations into the document file
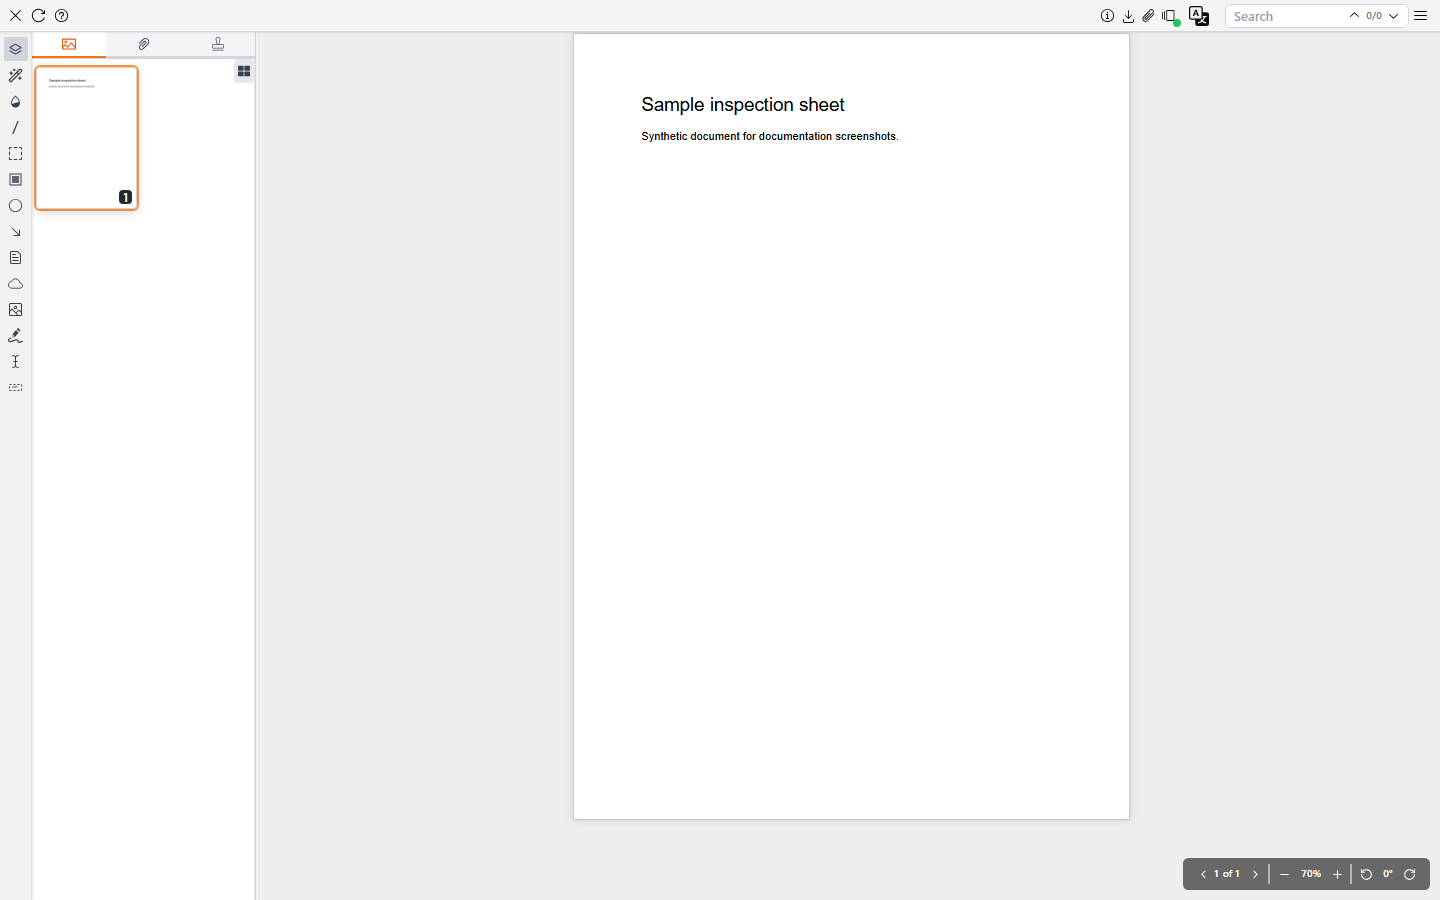
Annotation features
The vertical toolbar of the preview window includes icons that enable document annotation. These shapes and features can be added to the document. Hover over an icon to see its name. A drawing tool's name is followed by its keyboard shortcut, for example Rectangle (R): press the key to pick the tool, and Esc to put it down.
| Icon | Tool | Description |
|---|---|---|
 | Thumbnails | Shows or hides the side panel. |
 | Auto Redact | Opens the AI-assisted redaction dialog. |
 | Default Styles | Sets the colour and font size for new annotations. See Default Styles. |
 | Line | Draws a straight line. |
 | Rectangle | Draws a rectangle. |
 | Redaction | Activates the semi-manual redaction tool, for boxing a section to redact. |
 | Circle | Draws a circle or oval. |
 | Arrow | Draws an arrow, pointing to where you finish dragging. |
 | Note | Places a text box on the page, ready for you to type in. |
 | Cloud | Draws a cloud, often used to highlight an area that needs attention. |
 | Image | Opens the Add Image Annotation dialog. See Image annotations. |
 | Signature | Opens your saved signatures, where you can create one or pick one to sign with. See How to create a signature and sign a document. |
 | Signature Text | Adds your name, the date or custom text, for example beside a signature. See Signature Text. |
 | Draw Signature Field | Draws a placeholder field marking where a signature should be added later, and opens Assign Signature Fields so you can choose who signs it. See Signature fields. |
 | Undo (Ctrl+Z) | Undoes your last change to the annotations, such as drawing, moving, duplicating or deleting one. |
 | Redo (Ctrl+Shift+Z) | Puts back the change you last undid. |
 | Keep the tool selected after drawing | Keeps a drawing tool picked after you draw, so you can draw several shapes in a row. Click it again to go back to one shape at a time. |
To draw a shape, click its tool and then drag on the page. Each tool draws one shape and then switches off, so click the tool again to draw another. When you have several shapes of the same kind to draw, for example a cloud around each area of a drawing that needs rework, turn on Keep the tool selected after drawing first, and the tool stays picked until you turn it off. The Note tool works slightly differently: click it, then click the page where the text box should go, and start typing.
Note that some of these tools appear only if you have the relevant permissions.
When you click an annotation on the page, a small toolbar appears above it. Use it to change, repeat or remove that annotation without going back to the main toolbar.
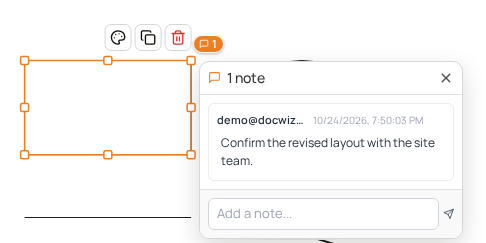
| Button | Description |
|---|---|
| Style | Opens the colour and font size settings for this annotation. |
| Duplicate (Ctrl+D) | Adds a copy of the annotation, for example to put the same cloud on several areas. |
| Delete (Delete) | Removes the annotation. |
You can also right-click an annotation. The menu has Delete and Duplicate.
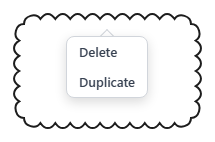
If you change your mind, Undo (Ctrl+Z) takes back your last change, including a duplicate or a delete, and Redo (Ctrl+Shift+Z) puts it back.
Selecting and zooming with the mouse
On a busy drawing you may want to change several annotations at once, or look closely at a small detail before you mark it up. You can do both with the mouse, without picking a tool.
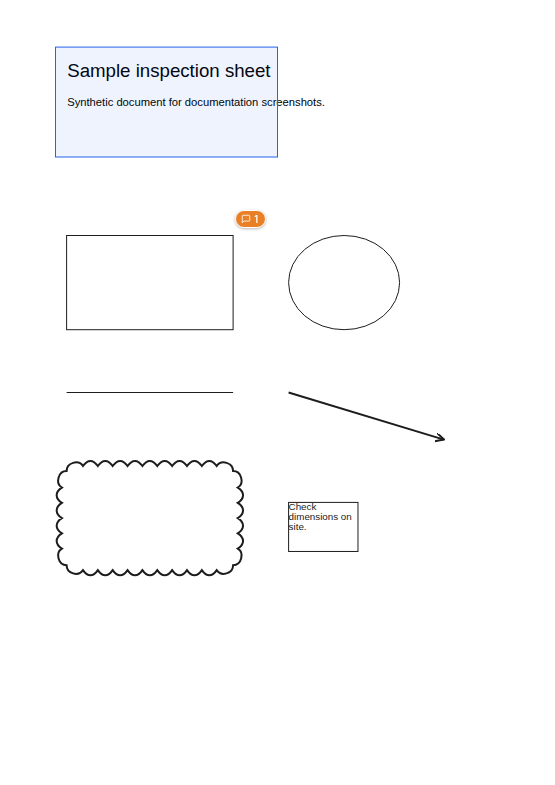
| What you do | What happens |
|---|---|
| Hold Shift and drag across the page | An orange box is drawn, and every annotation it touches is selected. |
| Hold Ctrl (Cmd on a Mac) and drag across the page | The pointer changes to a magnifying glass and a blue box is drawn. When you let go, the view zooms in so that the area in the box fills the preview. Nothing is selected or drawn. |
| Hold Ctrl and scroll | Zooms in or out around the pointer. |
Default Styles
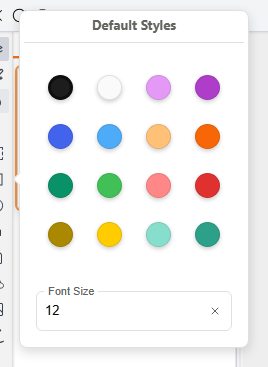
The Default Styles icon opens a small panel where you choose the colour and font size for the annotations you add next. Set it before you start marking up, so that your annotations stand out on the page, or follow a colour convention your team uses, for example red for corrections and blue for queries.
| Field | Description |
|---|---|
| Colour swatches | Sixteen colours to choose from. |
| Font Size | The size of the text in new annotations. |
Image annotations
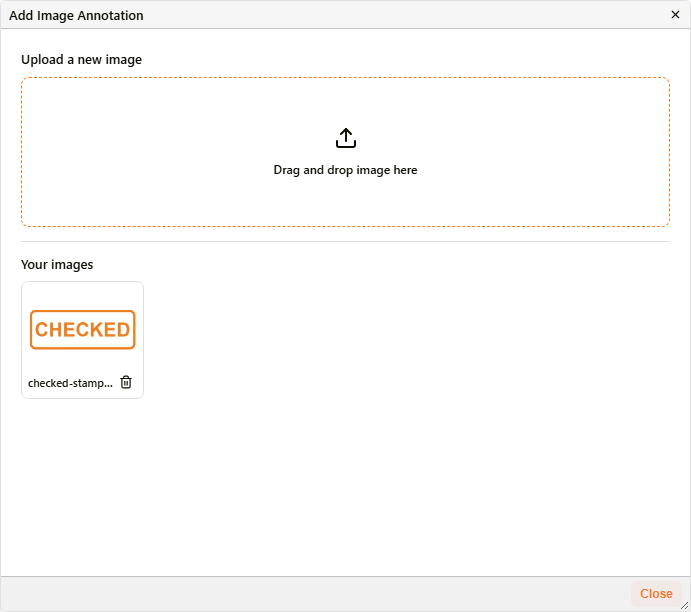
The Image icon lets you add a picture to the document, such as a company stamp or a site photo. Images you upload are kept in your own image library, listed under Your images the next time you open the dialog.
| Field | Description |
|---|---|
| Upload a new image | Drag and drop an image here. Once an image is chosen, Insert Image appears. |
| Your images | The images you have uploaded before. |
| Bin icon | Remove from my images takes the image out of your library. |
| Insert Image | Uploads the chosen image and closes the dialog. |
| Close | Closes the dialog. |
Signatures
Signing in Docwize lets you approve or sign off a document, such as a drawing, a certificate or a form, without printing it, signing it by hand and scanning it back in. The signed document replaces the current file, and the unsigned file is kept in its version history.
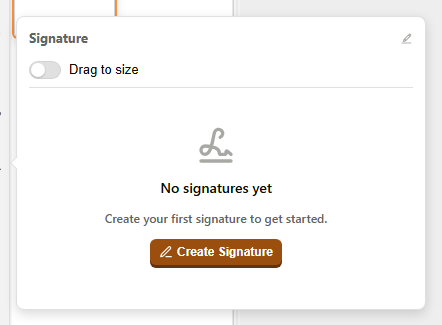
The Signature icon opens the Signature panel, which lists the signatures you have saved. You only need to create a signature once. Until you do, the panel shows No signatures yet and a Create Signature button. Once you have a signature, it is listed in the panel, and the button reads Create New Signature.
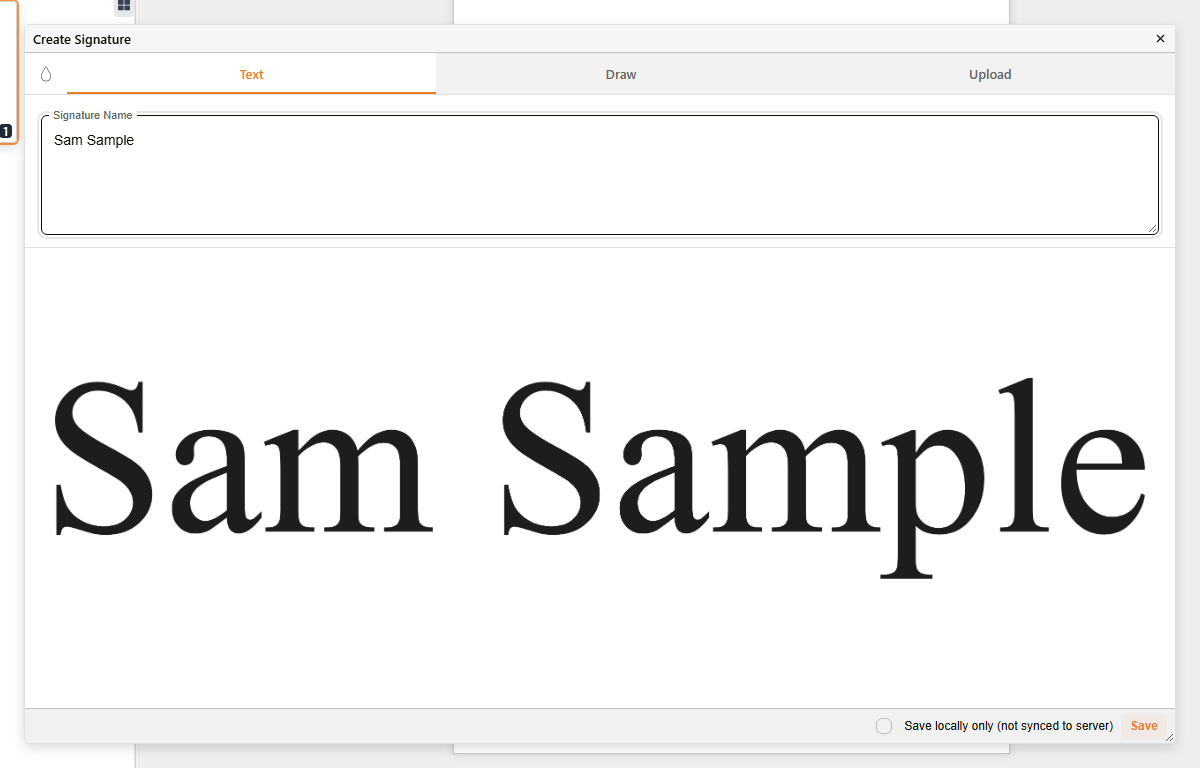
Create Signature opens a dialog with three ways to make a signature.
| Tab | Description |
|---|---|
| Text | Type your name in Signature Name, and Docwize shows it as a signature. |
| Draw | Draw your signature by hand. |
| Upload | Upload an image of your signature. |
Click Save. With Save locally only (not synced to server) left unticked, the signature is saved to your Docwize account, so it is listed in the Signature panel whenever you sign.
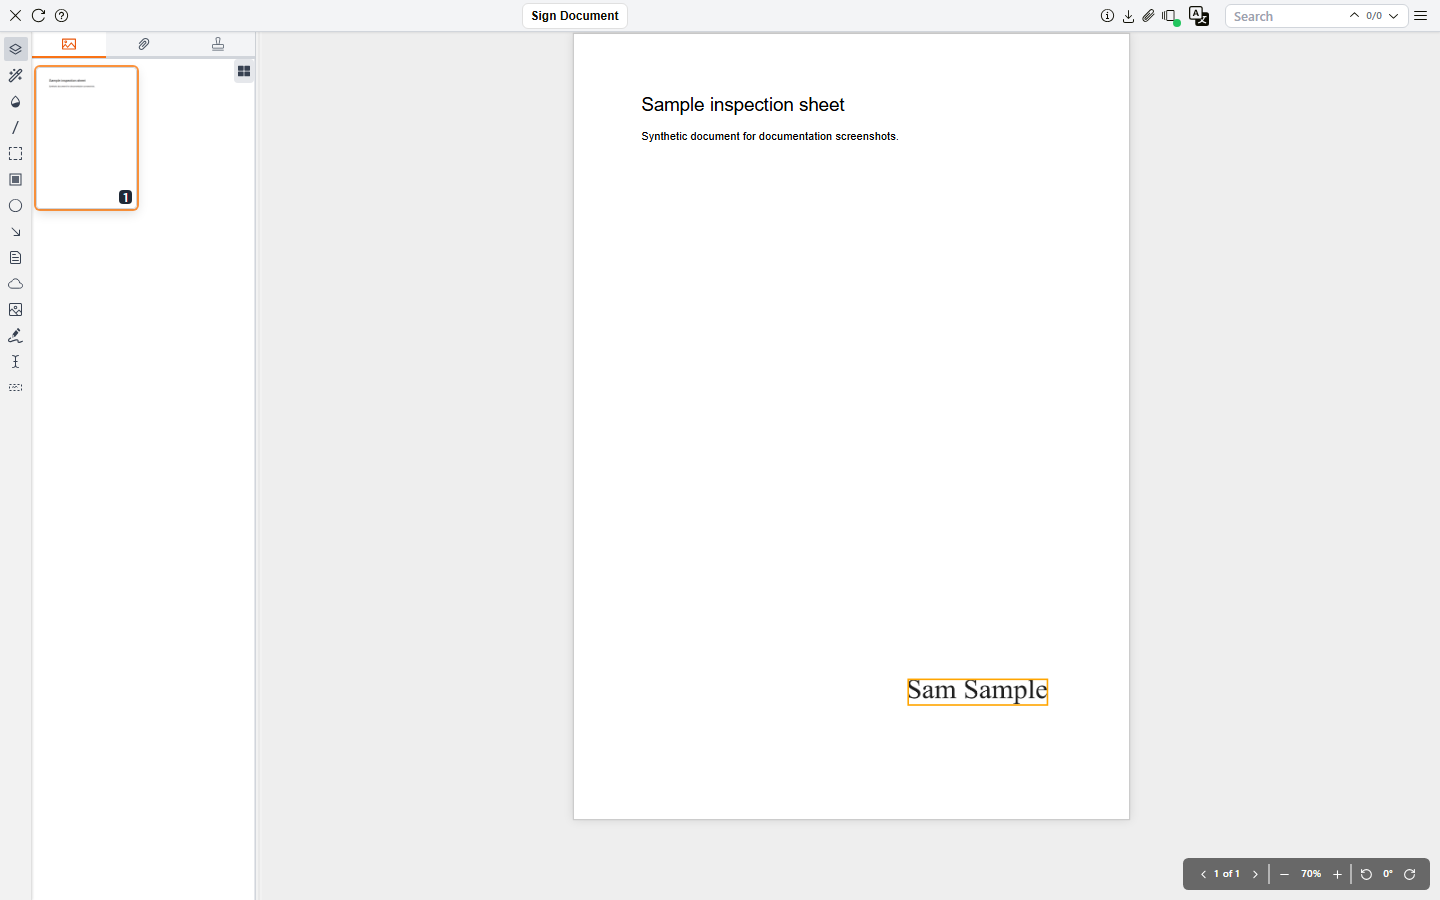
When you pick a signature, it is placed at a standard size where you click. When the signature has to fit a particular box or line, for example the signature block on a form, turn on Drag to size at the top of the Signature panel before you pick it, and drag a box on the page: the signature fits inside the box and keeps its proportions.
Once a signature is on the page, a Sign document button appears at the top of the preview. The signature is not part of the document until you click it.
Signature Text
Many forms ask for your printed name and the date beside your signature. The Signature Text icon opens a panel for adding that kind of text.
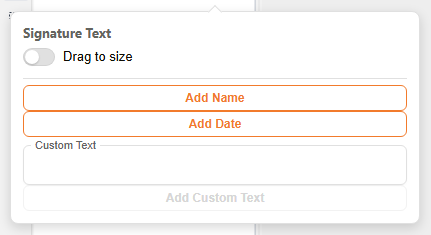
| Field | Description |
|---|---|
| Drag to size | Turns sizing by dragging on or off. |
| Add Name | Adds your name. |
| Add Date | Adds today's date. Click the page where the date should go. |
| Custom Text | Type any text here, then click Add Custom Text. |
Signature fields
When someone else has to sign a document, a signature field shows them exactly where. This is useful on forms and drawings with a specific signature block. A signature field marks the place where someone should sign later. Click Draw Signature Field and drag a box on the page. The Assign Signature Fields dialog opens straight away so you can choose who the field is for.
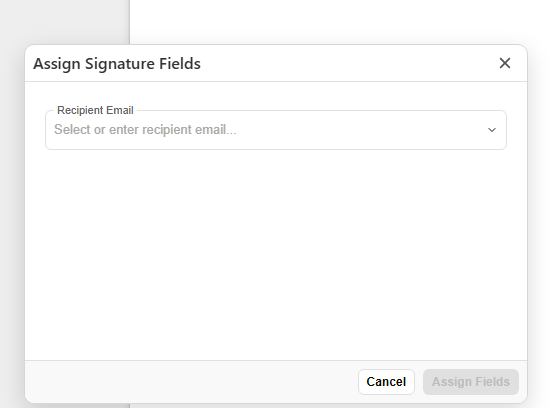
| Field | Description |
|---|---|
| Recipient Email | Choose or type the email address of the person who should sign. |
| Cancel | Closes the dialog and removes the field you drew. |
| Assign Fields | Assigns the field to the recipient. It is unavailable until an email is chosen. |
Notes on annotations
Any annotation can carry a thread of notes. When you add an annotation, or click one that is already on the page, a note card opens beside it. This is where you explain the mark-up, ask a question or reply to someone else's note.
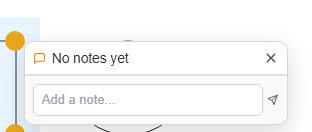
Type in the Add a note... field and click the send icon. The note is added to the thread with the author's email address and the date, and the card's heading changes to show how many notes there are.
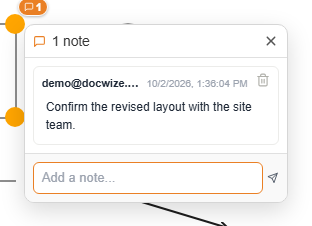
Once an annotation has notes, a small orange marker with the number of notes appears beside it on the page. To delete a note, click the bin icon beside it.
Note that this is a separate feature from the private/shared document notes described in Notes. A note on an annotation belongs to that annotation, and there is no private/shared setting for it.
Side panel
The side panel next to the annotation toolbar helps you find your way around while you annotate: jump to a page on a long document, check its attachments, or pick a stamp. Click a tab at the top of the panel to switch between them.
| Tab | Name | Description |
|---|---|---|
 | Thumbnails | Shows a thumbnail of each page of the document. |
 | Attachments | Lists the attachments of the document being previewed. |
 | Toolchest | Accesses the stamp collection(s) that can be applied to the document. |
Review panel
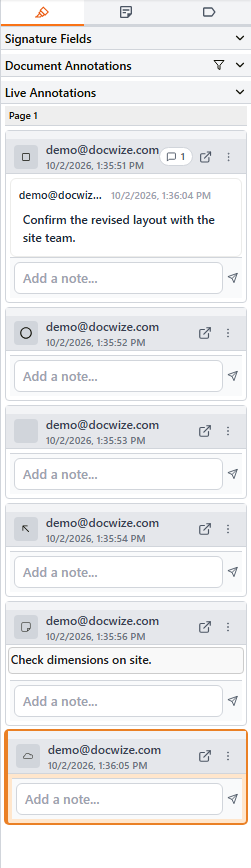
On a long or heavily marked-up document it is easy to lose track of what has been commented on. To see every annotation on the document in one list, for example to check that every comment has been dealt with, open the review panel with the  menu icon at the top right of the Preview Document toolbar. The panel has three tabs.
| Tab | Name | Description |
|---|---|---|
 | Annotations | Lists the annotations on the document. |
 | Notes | Shows the document's notes. |
 | Tags | Shows the document's tags. |
The Annotations tab is split into three sections. Click a section's heading to expand or collapse it.
| Section | Description |
|---|---|
| Signature Fields | Signature fields that are part of the document file. |
| Document Annotations | Annotations that are already part of the document file itself. |
| Live Annotations | The annotations added in Docwize, grouped by page. Each card shows who added it and when, along with its notes and an Add a note... field. |
Burning annotations into the document
Annotations you add in Docwize are live: they sit on top of the document, so they can still be changed or deleted, and each one keeps its thread of notes. That suits a document that is still being reviewed.
Once the mark-up is final, for example a checked drawing that is going to a contractor, or a document that needs a permanent record of the comments on it, burn the annotations in. Burn annotations writes them into the document file itself, so they become part of the file and stay with it, for example when it is downloaded. The button appears at the top of the preview toolbar whenever the document has live annotations.
Burning and signing share this one button, and its label says what it will do: Burn annotations, Sign document, or Burn annotations & sign when the document has both live annotations and a signature waiting. Hover over the button to see the steps it will take. While it works, the button shows which step it is on.
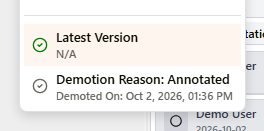
Once they are burned, the annotations move from Live Annotations to Document Annotations in the review panel. Docwize keeps the file as it was before: click View file versions at the top right of the preview toolbar, and the earlier file is listed with Demotion Reason: Annotated.
How to annotate a document
| Step | Description |
|---|---|
| 1 | Open the document in the Preview Document window. |
| 2 | Click a tool in the annotation toolbar, for example Rectangle. |
| 3 | Drag on the page to draw the shape. |
| 4 | In the note card that opens, type a note about the annotation and click the send icon. This step is optional. |
| 5 | Close the note card. Repeat from step 2 for each annotation you want to add. |
Here is an example of how to add annotations to a document:
Example: Adding document annotations
How to add a note to an annotation
| Step | Description |
|---|---|
| 1 | Click the annotation on the page. Its note card opens. |
| 2 | Type in the Add a note... field. |
| 3 | Click the send icon. |
To read the notes later, click the annotation again, or open the review panel's Annotations tab.
How to delete an annotation
| Step | Description |
|---|---|
| 1 | Right-click the annotation on the page. |
| 2 | Click Delete in the toolbar above the annotation, or right-click the annotation and click Delete. |
To bring back an annotation you deleted by mistake, click Undo (Ctrl+Z).
How to undo a change
| Step | Description |
|---|---|
| 1 | Click Undo (Ctrl+Z) in the annotation toolbar, or press Ctrl+Z. Your last change to the annotations is taken back. |
| 2 | To put the change back, click Redo (Ctrl+Shift+Z), or press Ctrl+Shift+Z. |
How to burn annotations into a document
| Step | Description |
|---|---|
| 1 | Open the document in the Preview Document window. |
| 2 | Click Burn annotations at the top of the toolbar. |
| 3 | Wait while Docwize burns the annotations. The document reloads with the annotations as part of the file. |
How to create a signature and sign a document
| Step | Description |
|---|---|
| 1 | Navigate to the Preview Document window and to the annotation toolbar. |
| 2 | Click Signature. |
| 3 | Click Create Signature. |
| 4 | Choose Text, Draw or Upload, and create your signature. See Signatures. |
| 5 | Click Save. |
| 6 | To sign the document, click Signature again and click your signature. |
| 7 | Click the page where the signature should go. |
| 8 | Click Sign document at the top of the page. |
If you already have a signature, start at step 6.
If the document still has live annotations when you sign, the button reads Burn annotations & sign. Docwize burns the annotations into the document first, then signs it, so nothing changes the file after it is signed. You don't need to burn them beforehand.
After signing, Docwize keeps the unsigned file. It is listed in View file versions with Demotion Reason: Signed.
Here is an example of how to create a signature and sign a document:
Example: Creating a signature and signing a document